.png)
1.Violation Detection
1.1 Dashboard
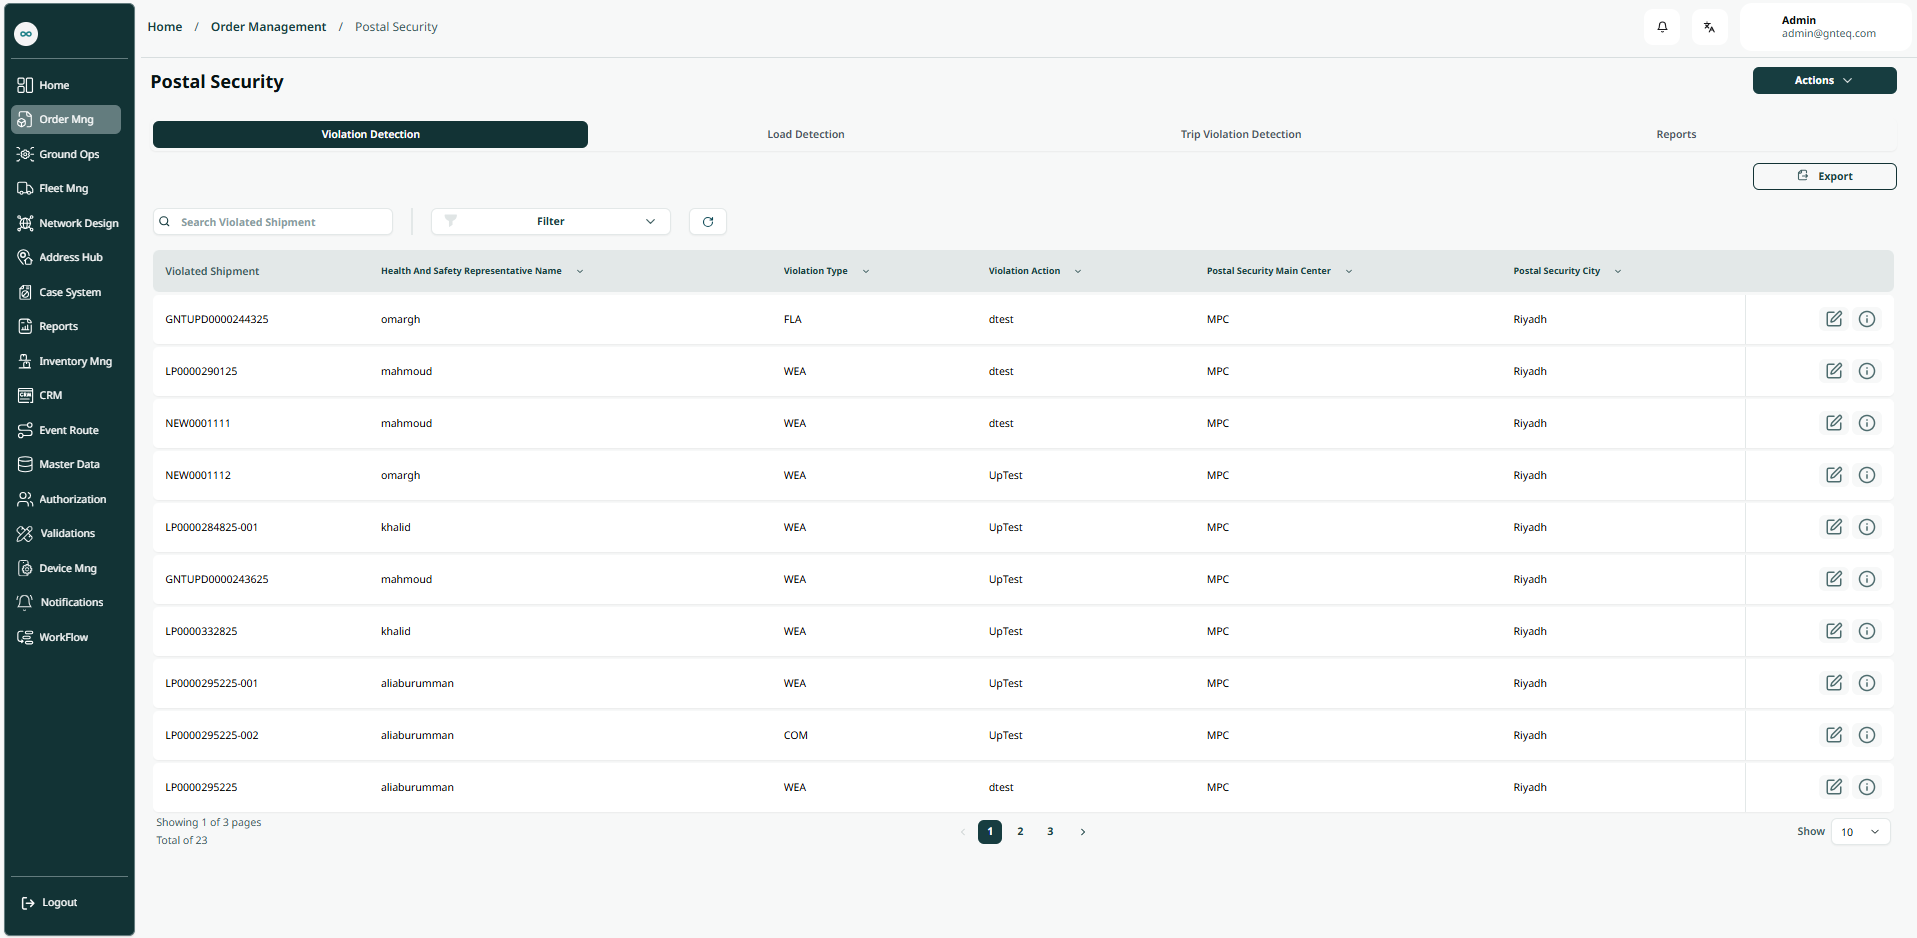
The user can view the defined violations detections in the system by navigating to the ‘Postal Security’ screen in the Order Management from the left navigation panel as follows, and select violation security:
-
Actions: the user can select a certain action from the multiple actions (Violation detection, Load detection, Trip violation detection) by clicking on “Actions”.
-
Filters: the user can search for the violation type, violation action, postal security main center………… etc.
-
Export: the user can export the list as an Excel file by selecting the 'Export' button.
-
Search: the user can search for violation detection by entering the violated shipment.
-
Rows Per Page: the user can select the number of items to show on each page.
-
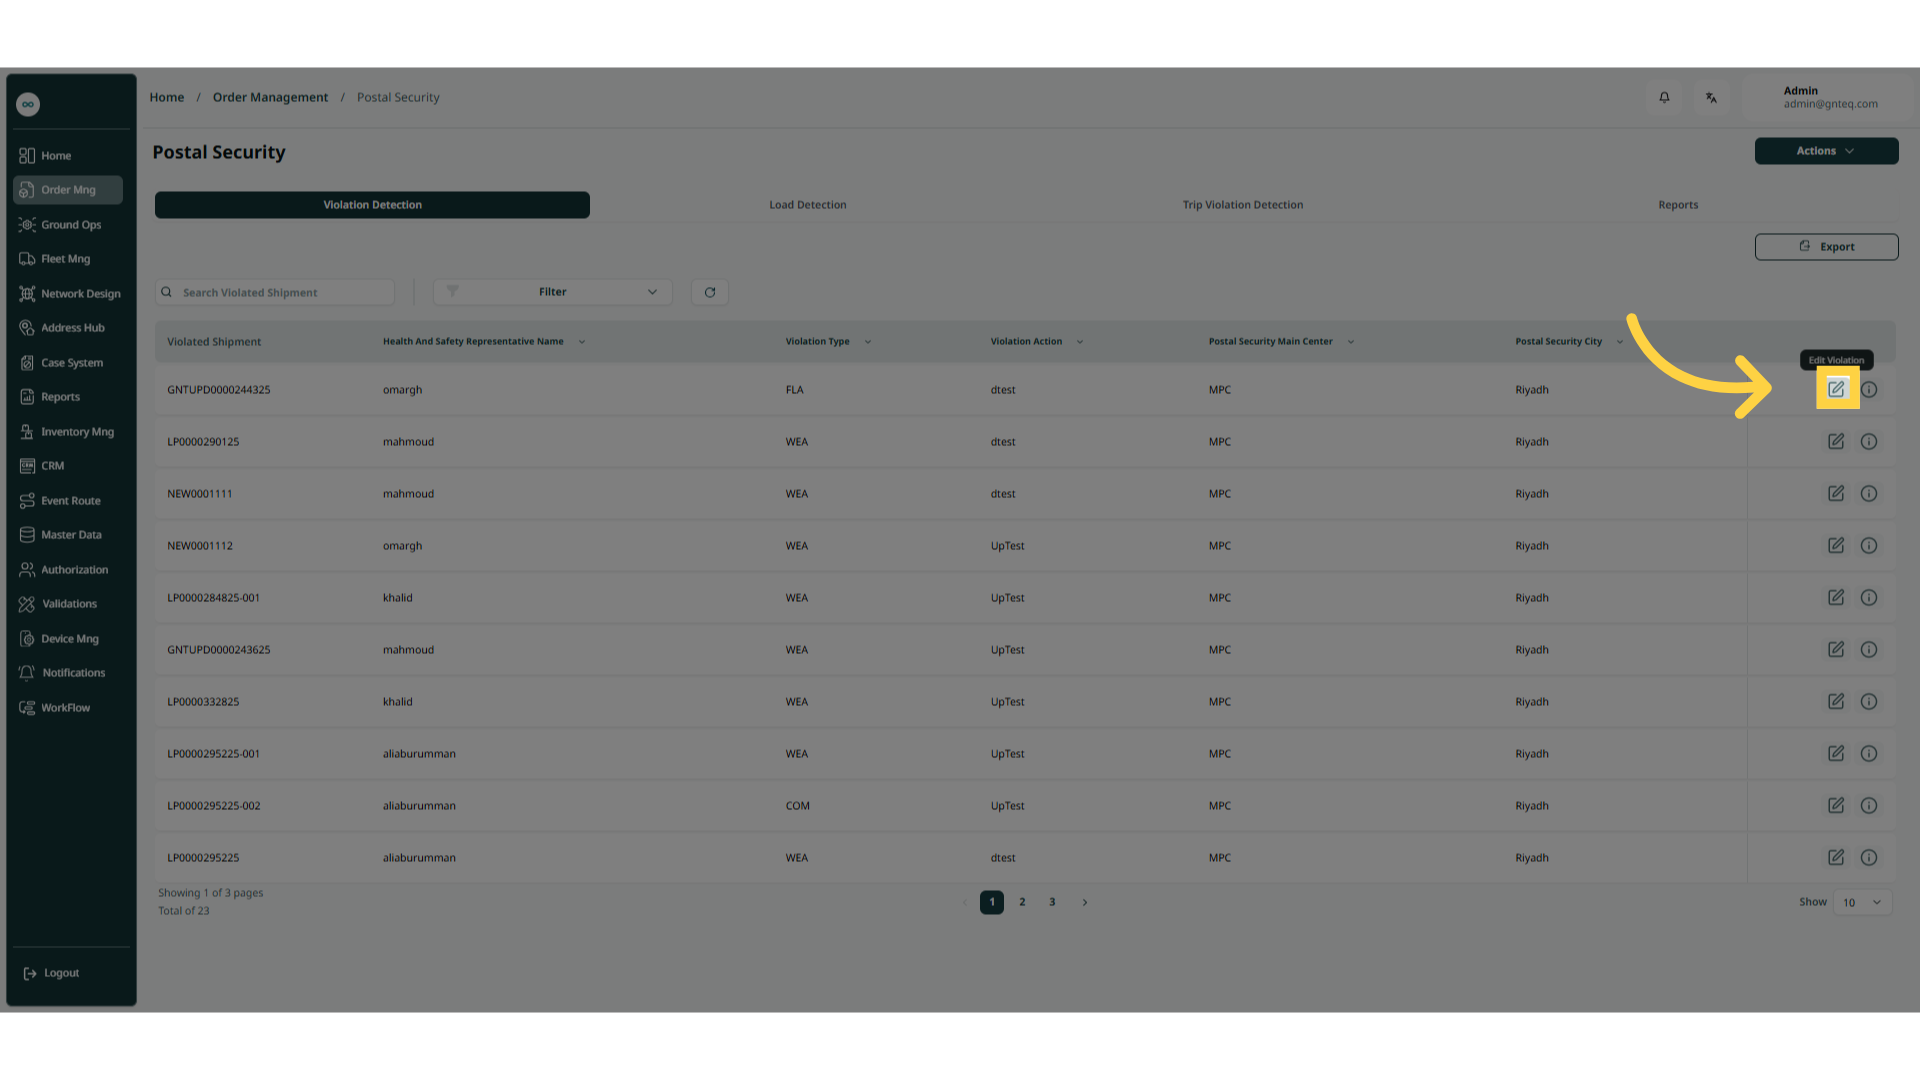
Actions: by clicking on Actions, the user can edit the violation detection by going to the edit violation detection section, or delete the violation detection.
1.1.1 Edit Information
The user can edit the violation detection by clicking on Edit from Actions, by navigating to the ‘Postal Security’ screen via Order Management.
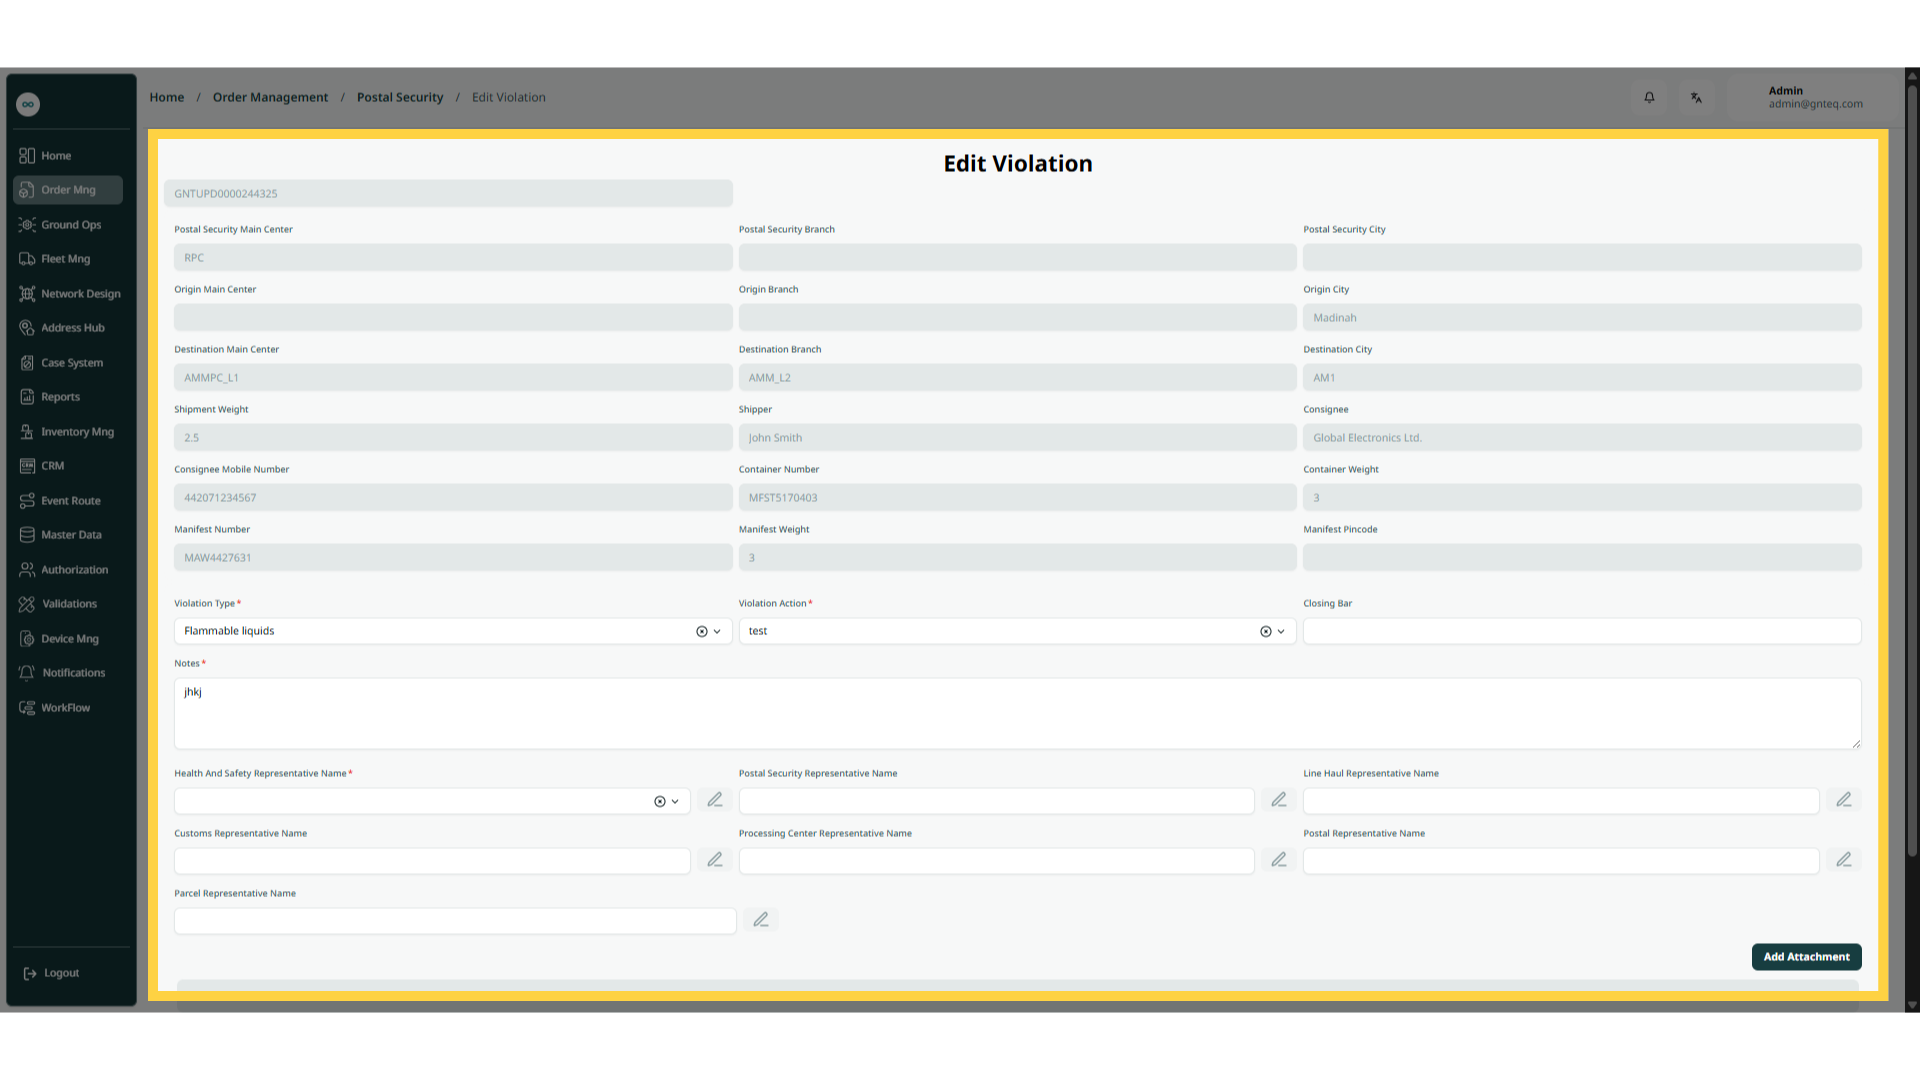
-
Add Attachment: the user can add any attachments that are related to the official mail by clicking on Add Attachment.
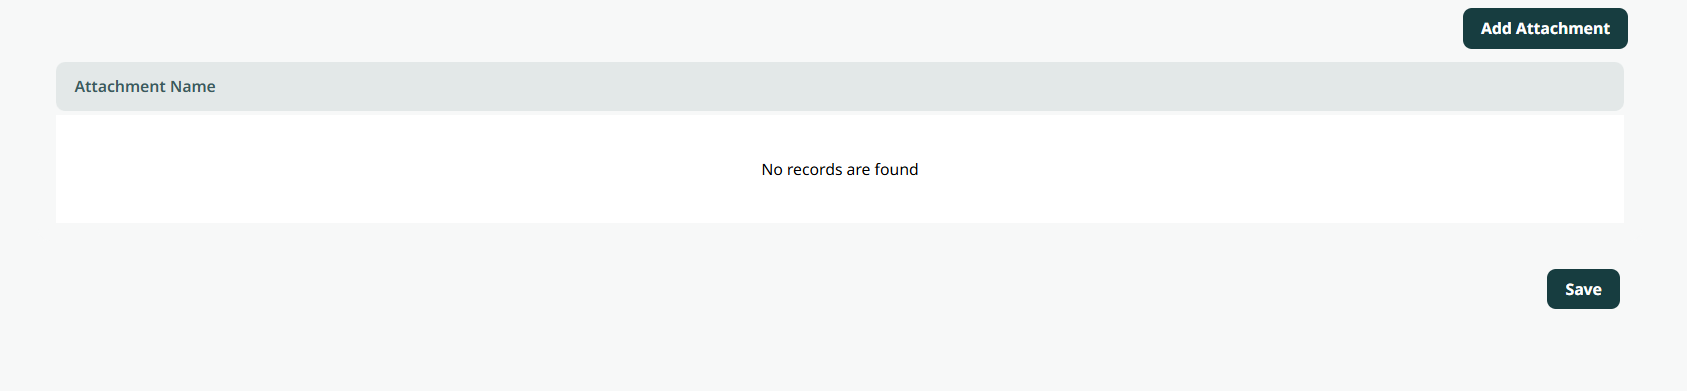
By clicking on Save Changes, the information will be updated successfully.
1.1.2 View Details
The user can view details of the violation detection by clicking on Edit from Actions, by navigating to the ‘Postal Security’ screen via Order Management.
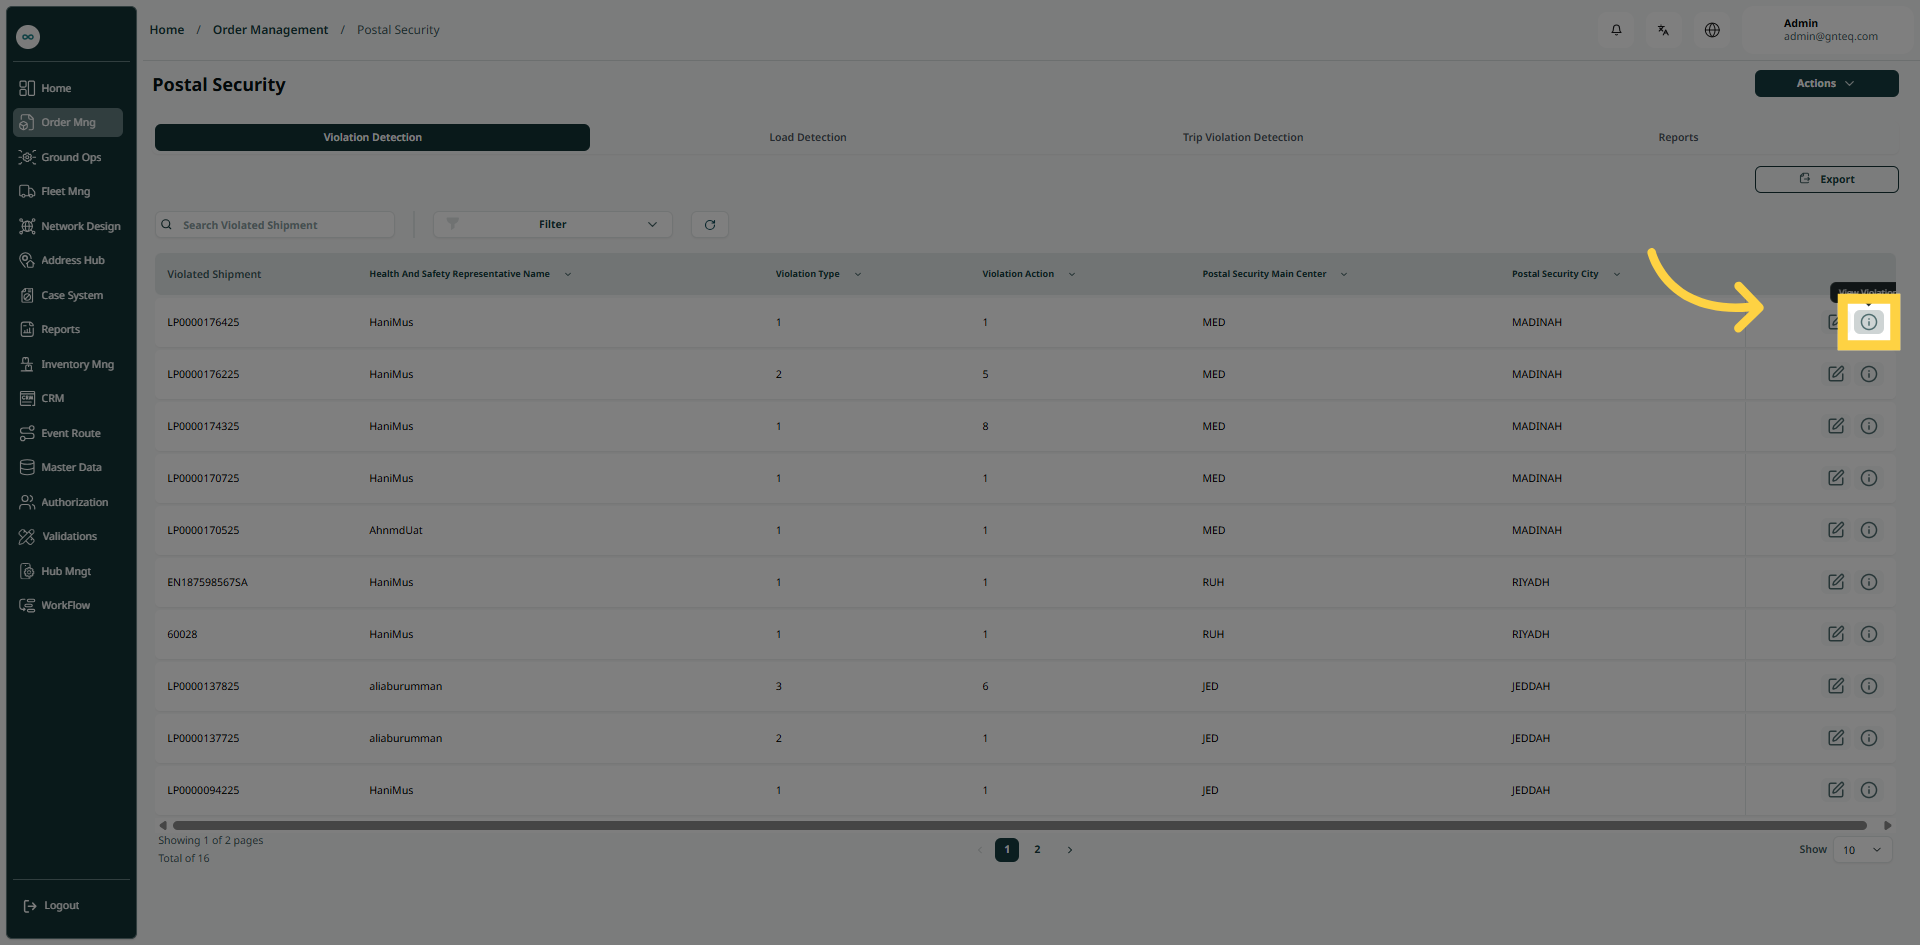
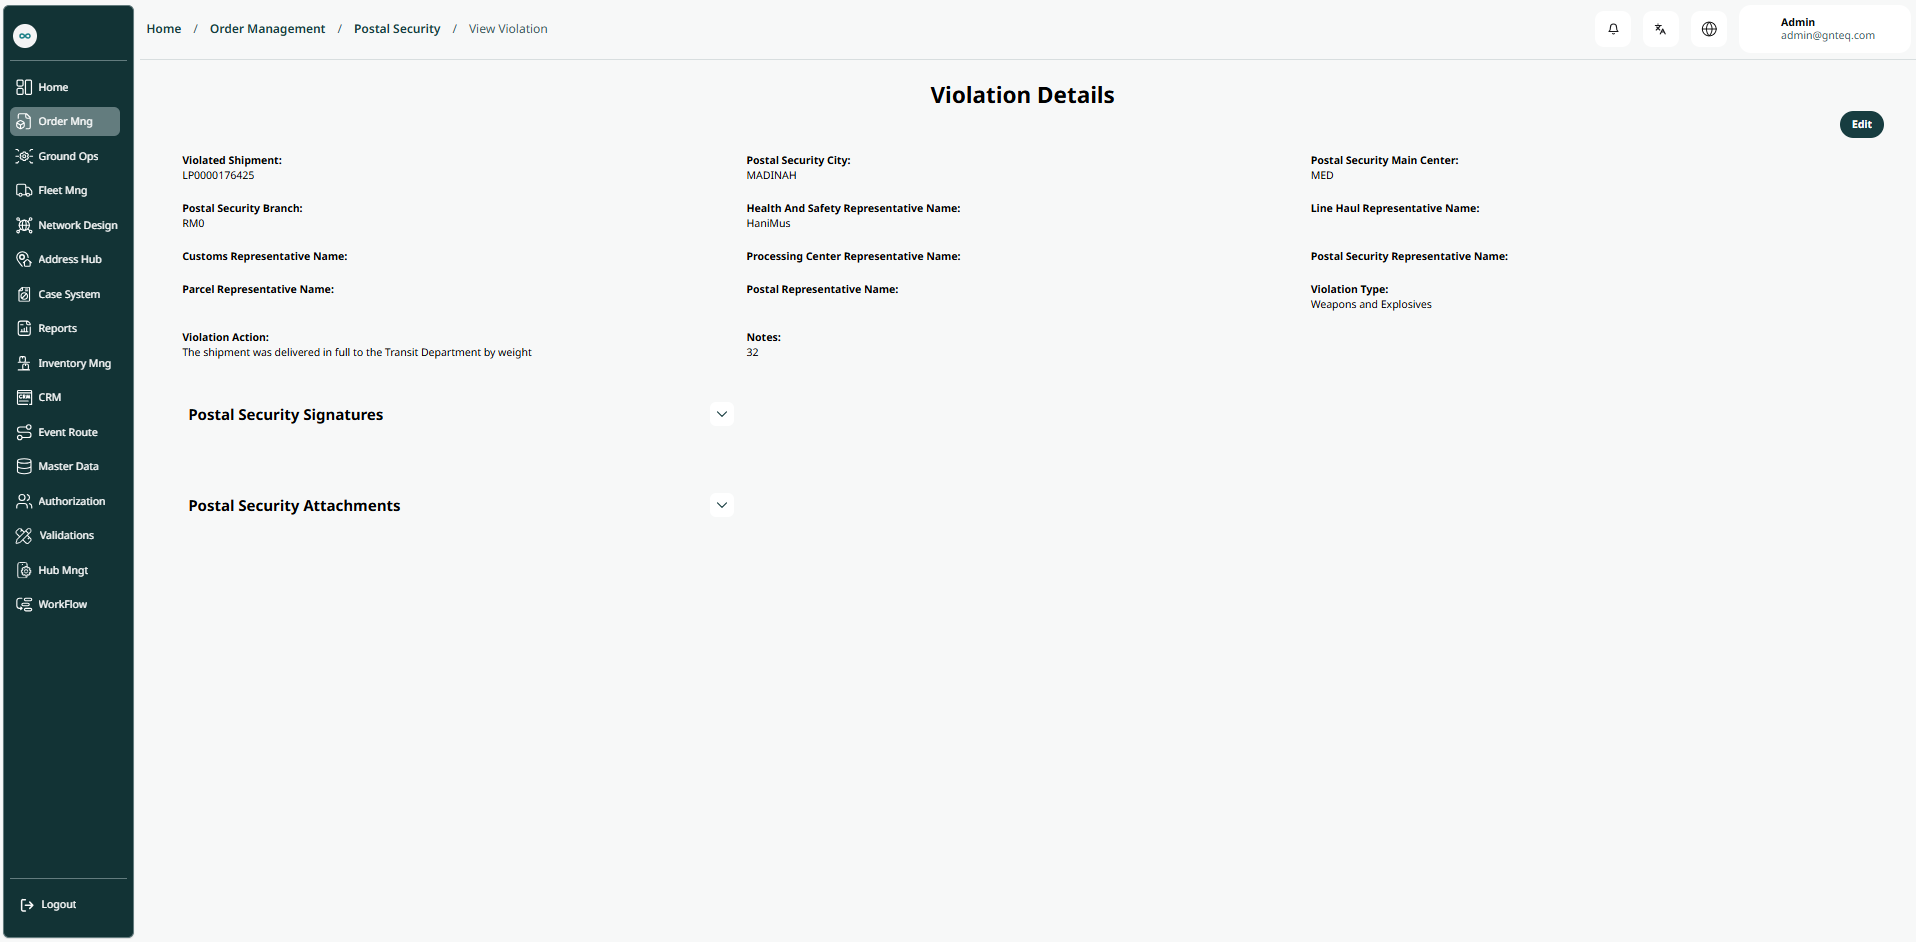
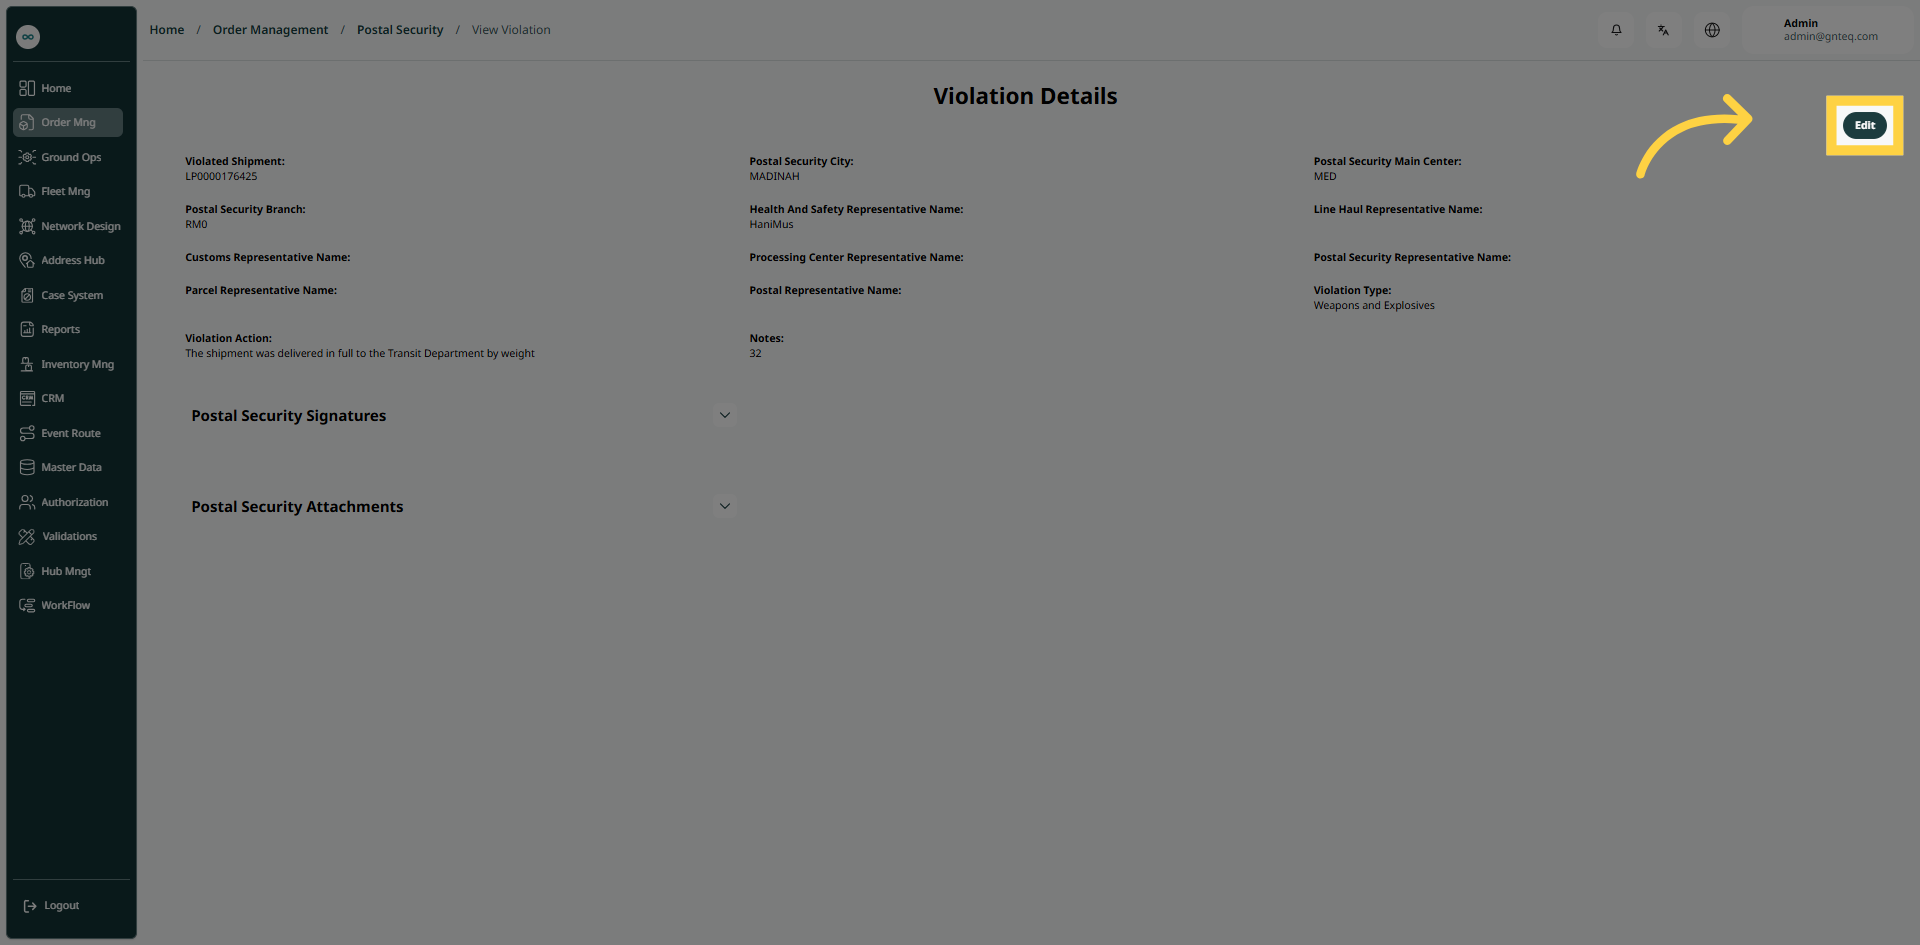
Edit: the user can edit the violation by going to the “Postal Security” screen via the Order Management and clicking on View Violation from Actions and then clicking on Edit as follows:
1.2 Add New Violation Detection
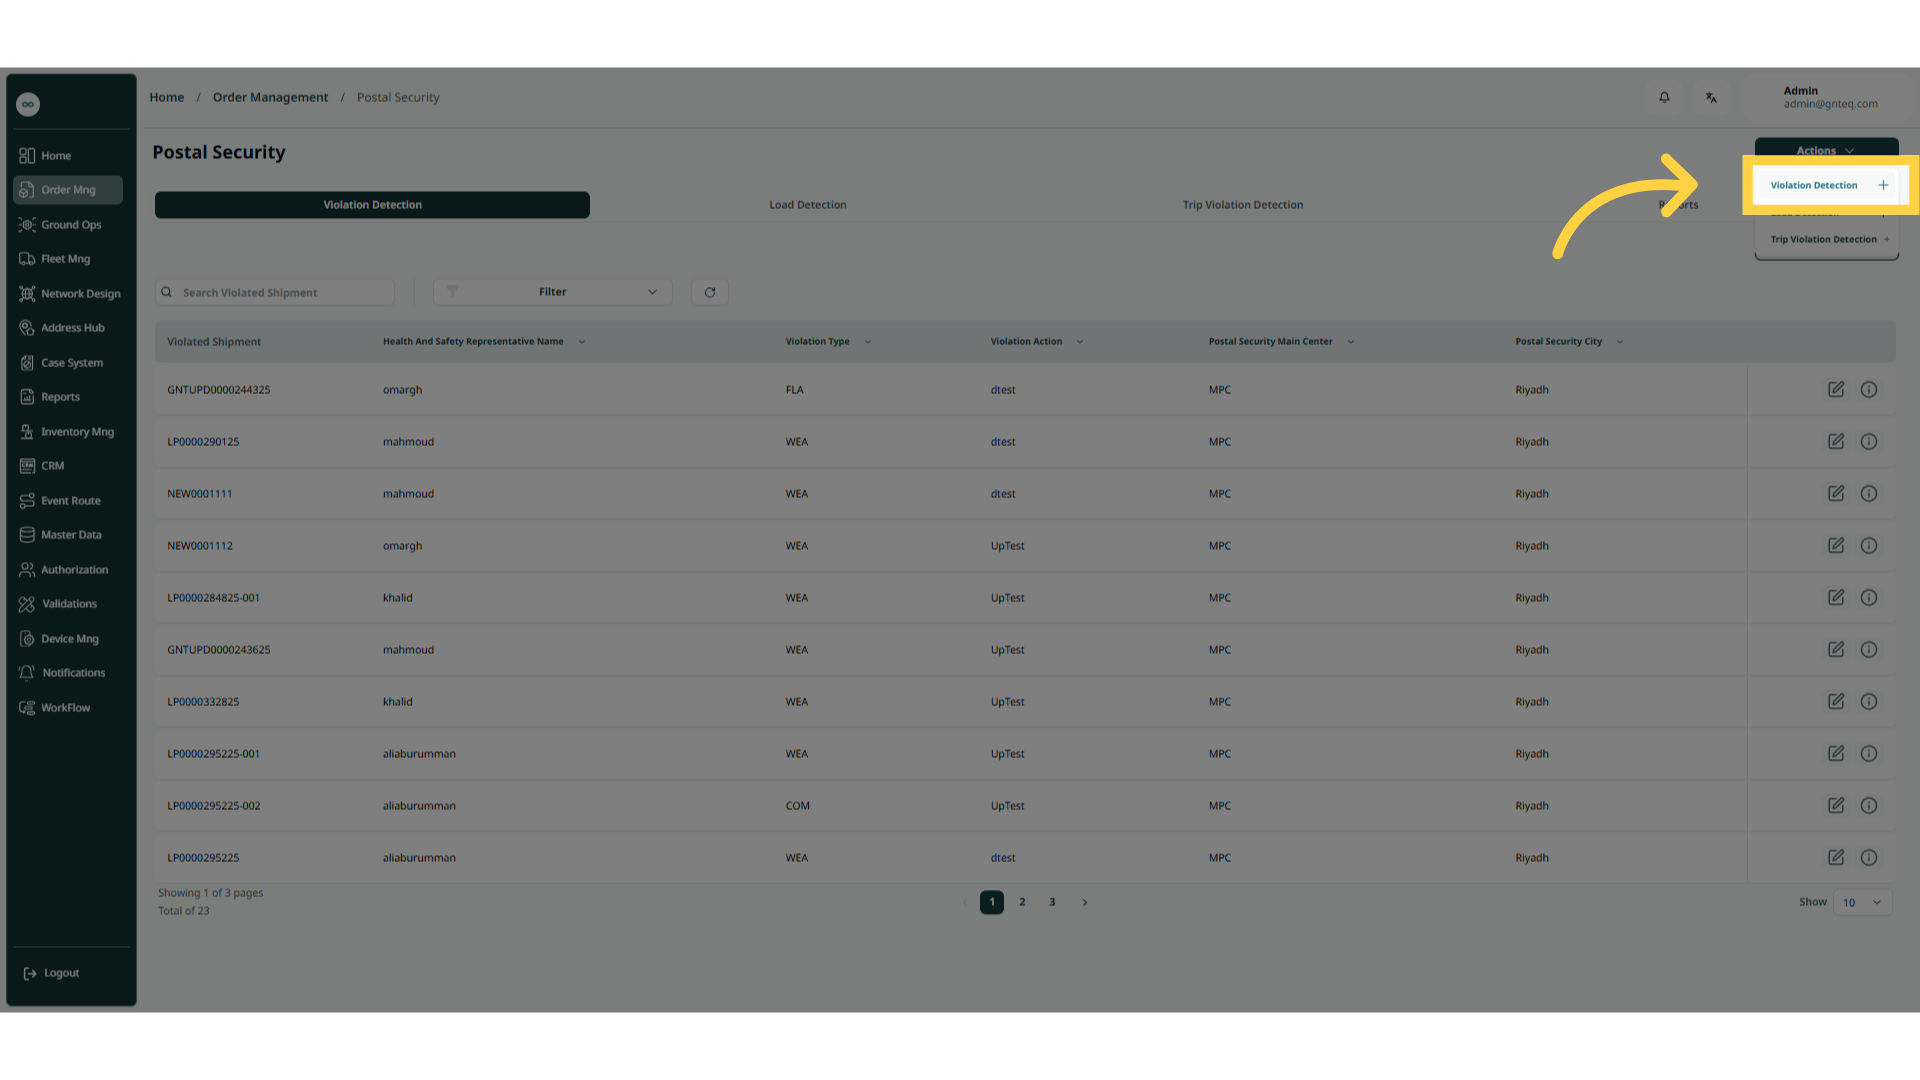
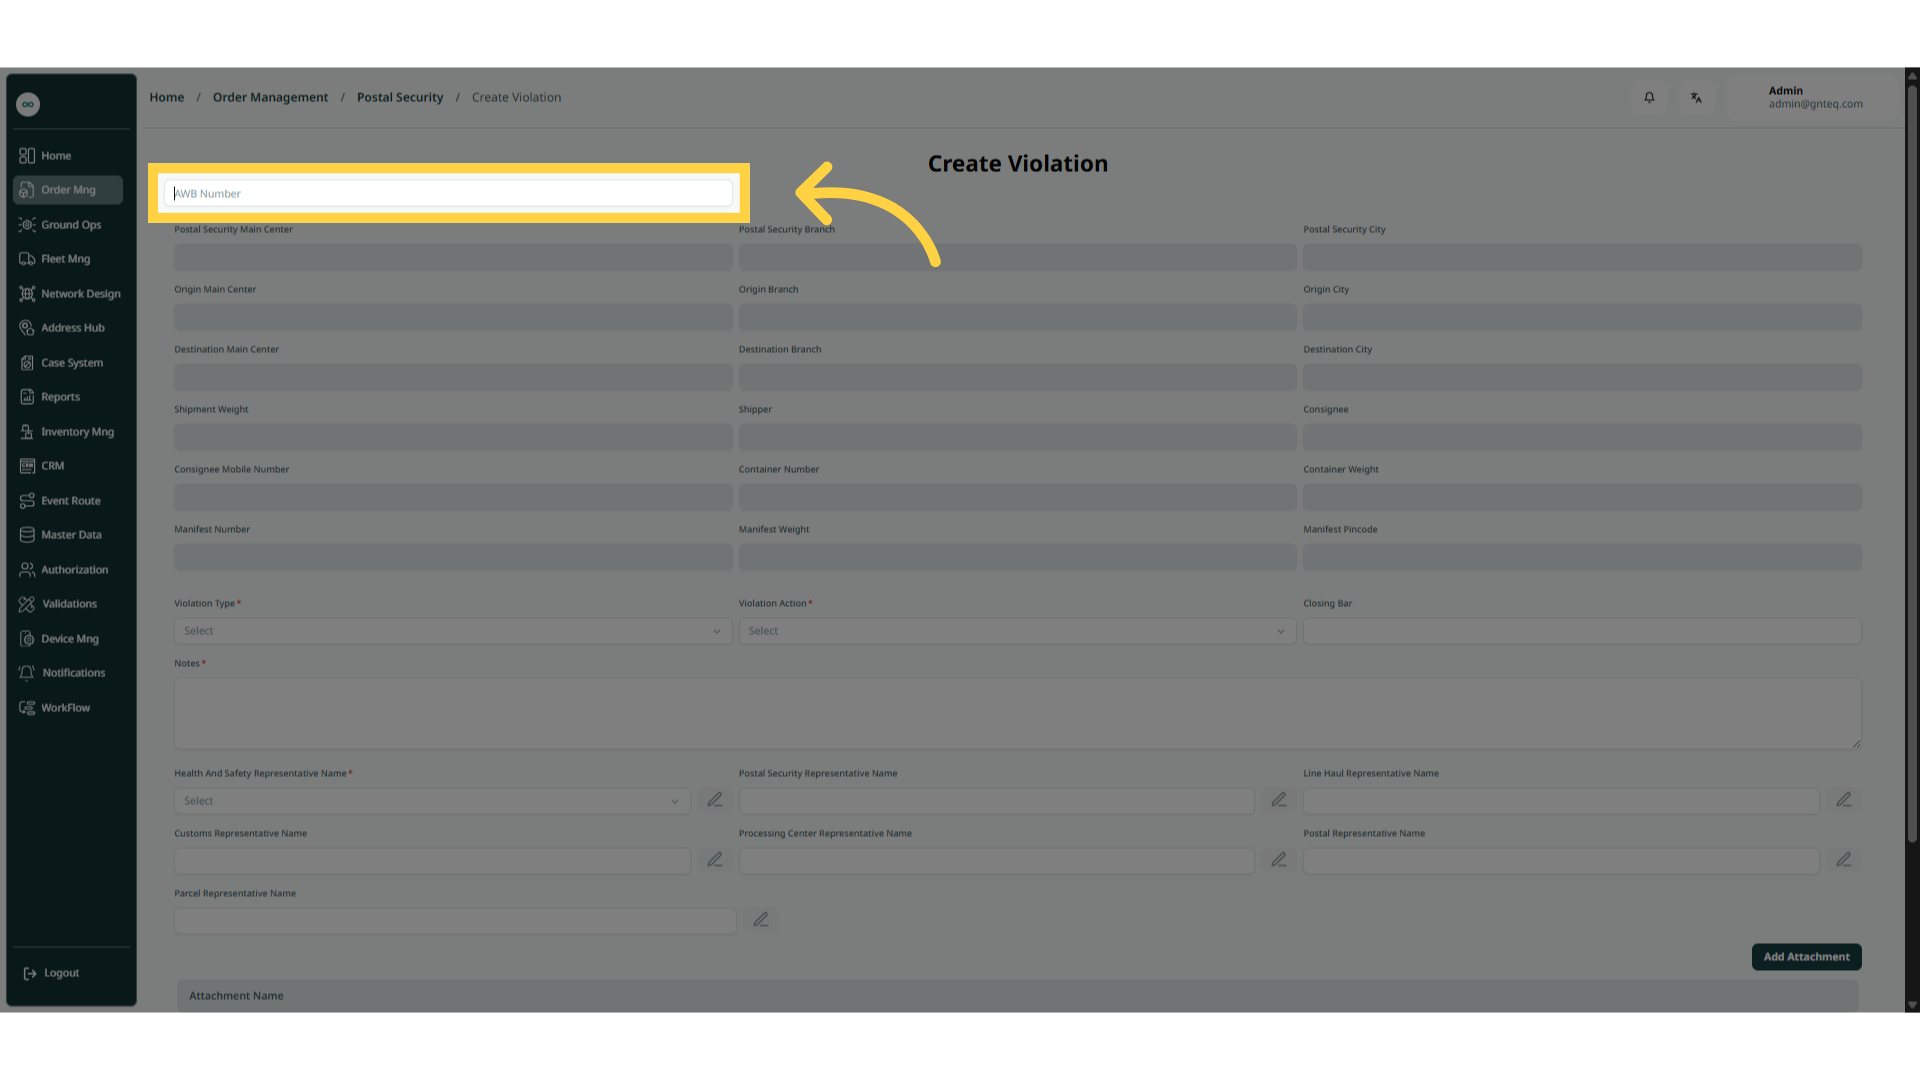
The user can create a new violation detection by clicking on Actions and selecting Violation Detection by navigating to the ‘Postal Security’ screen via the Order Management.
-
AWB Number: this field represents the shipment’s AWB number. After entering it, the system will automatically display the shipment details.
-
Note: When adding a new shipment number to the system, the data will be automatically populated.
Add Attachment: The user can add an attachment for the violation by navigating to the "Postal Security" screen via Order Management, clicking on "Violation Detection" under "Actions," and then clicking "Add Attachment."
By clicking "Next," the system will add the active shipment.
2. Load Detection
2.1 Dashboard
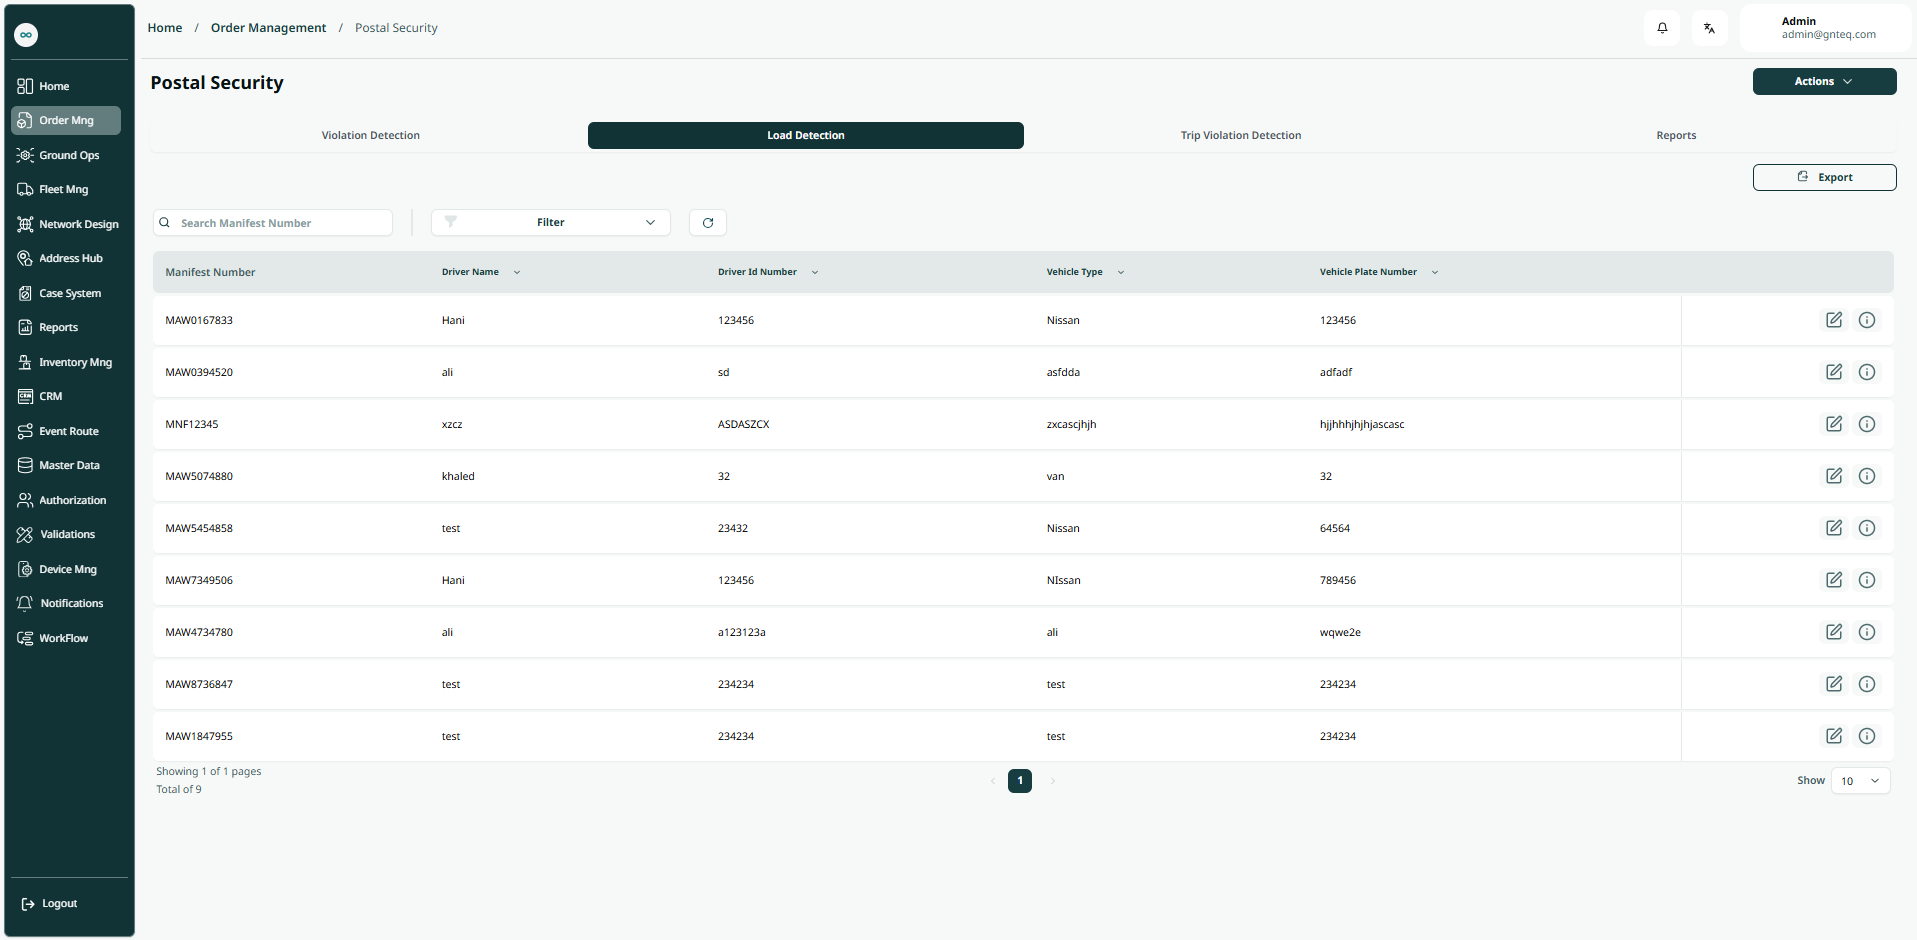
The user can view the defined Load detection in the system by navigating to the ‘Postal Security’ screen in the Order Management from the left navigation panel as follows and select Load Detection:
-
Actions: the user can select a certain action from the multiple actions (Violation detection, Load detection, Trip violation detection) by clicking on “Actions”.
-
Export: The user can export the list as an Excel file by selecting the 'Export' button.
-
Filters: the user can search for the vehicle type, driver name………… etc.
-
Search: The user can search for load detection by entering the manifests number.
-
Rows Per Page: the user can select the number of items to show on each page.
-
Actions: By clicking on Actions, the user can edit the load detection by going to the Edit load detection section, or delete the load detection.
2.1.1 Edit Information
The user can edit the load detection by clicking on Edit from Actions by navigating to the ‘Postal Security’ screen via the Order Management.
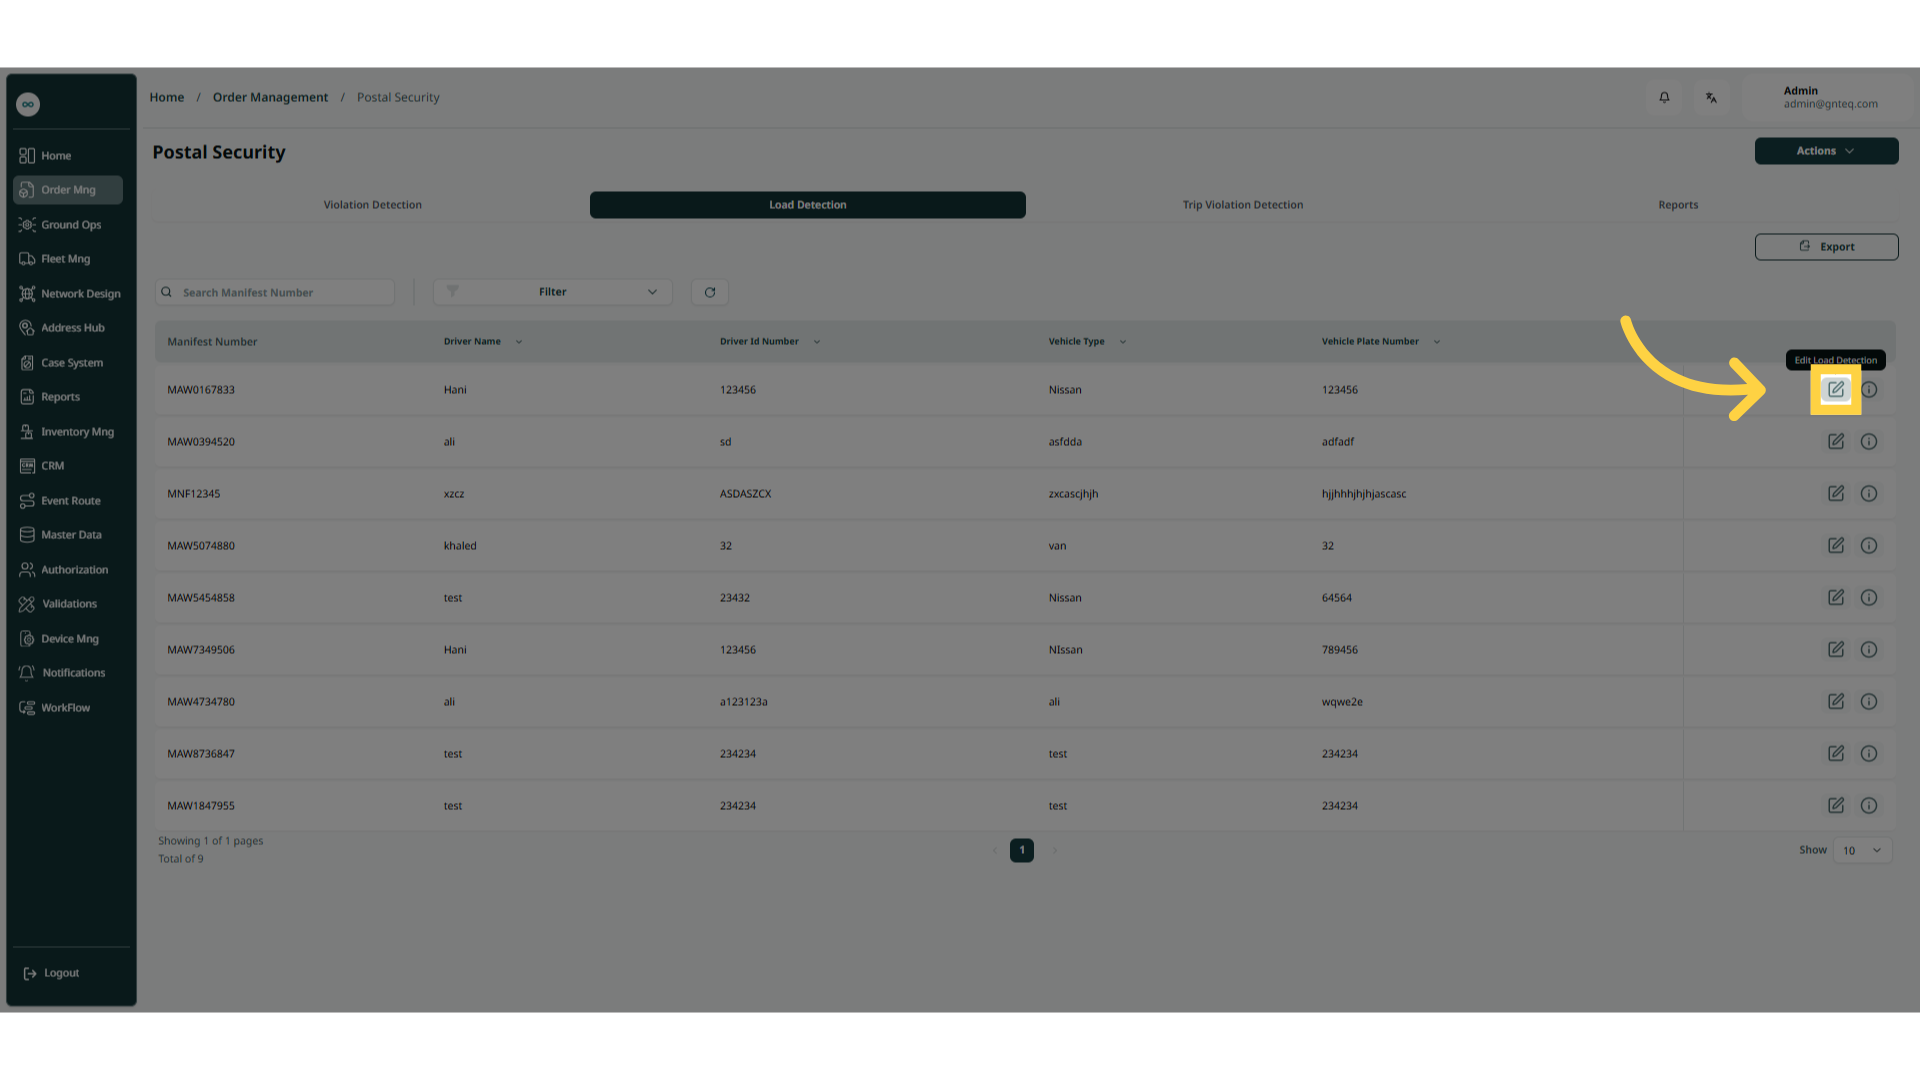
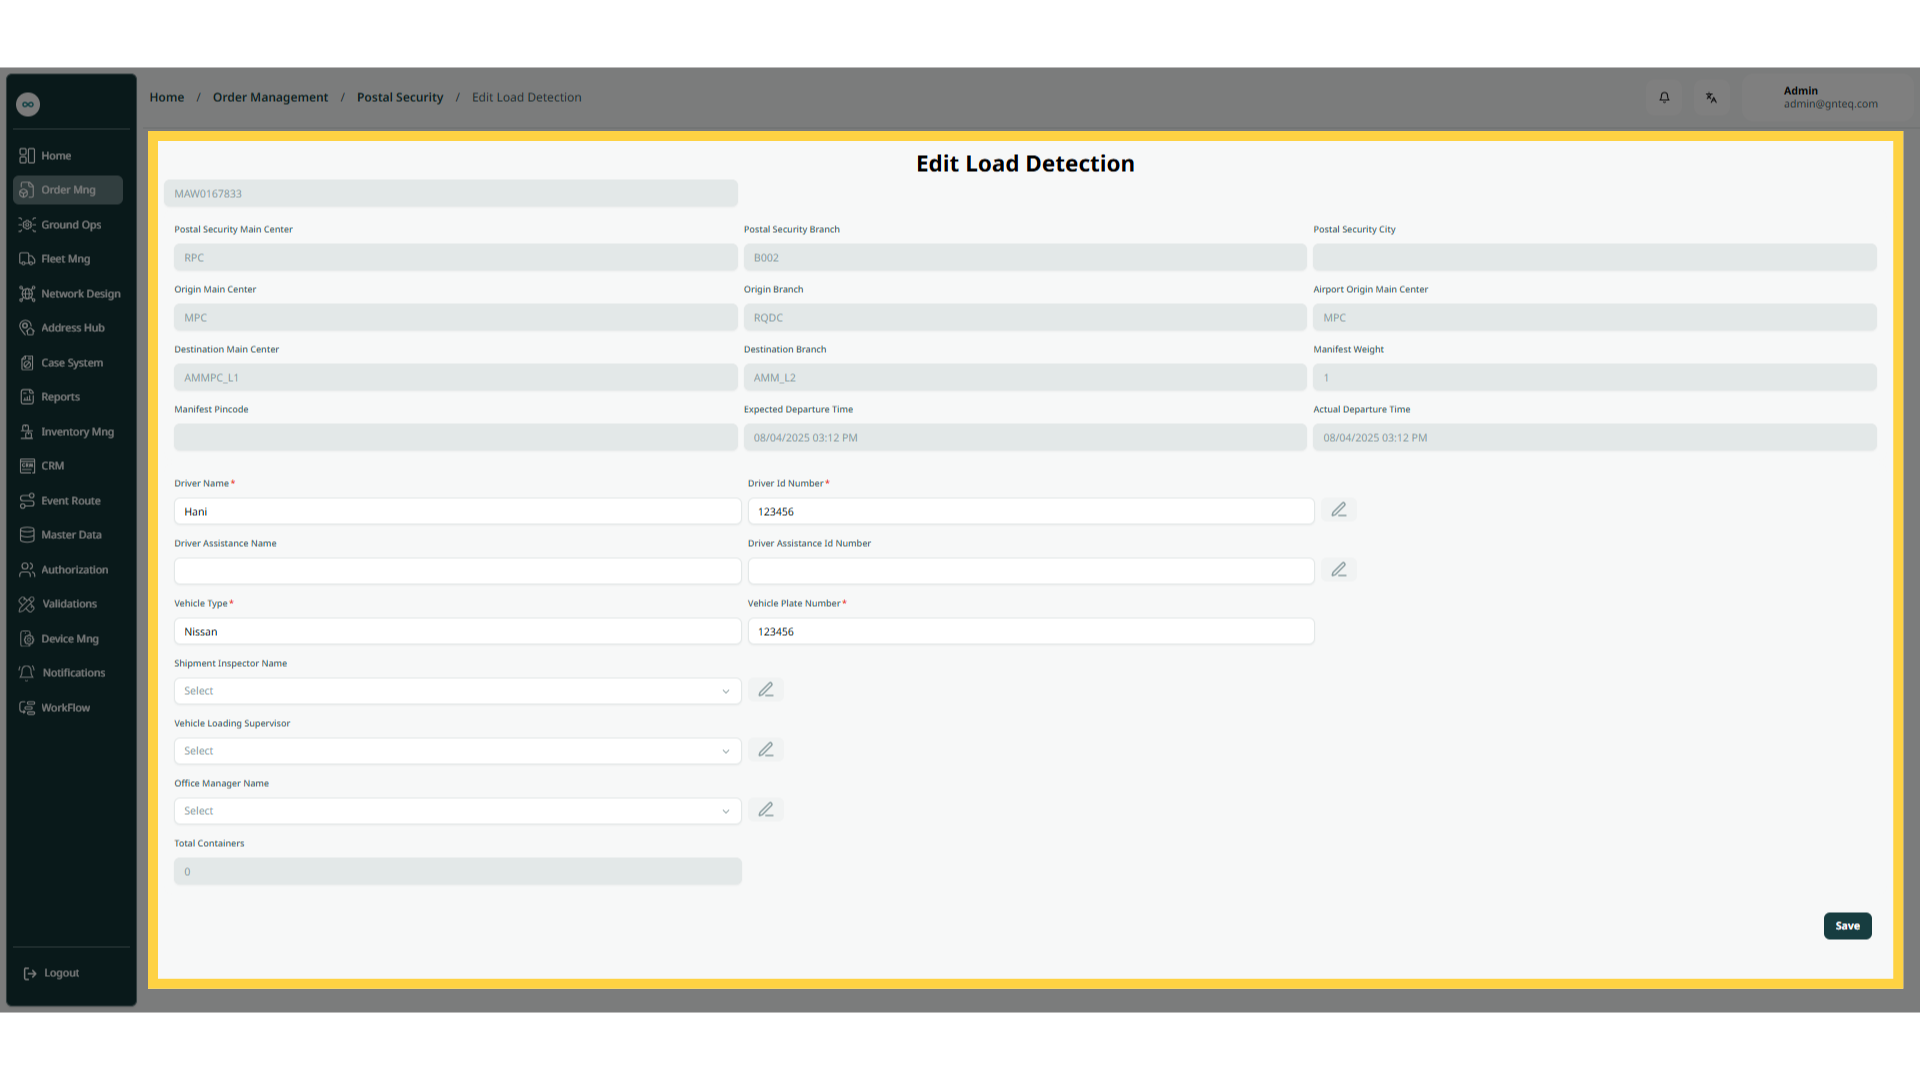
By clicking on Save, the information will be edited successfully.
2.1.2 View Details
The user can view details of the load detection by clicking on Edit from Actions, by navigating to the ‘Postal Security’ screen via Order Management.
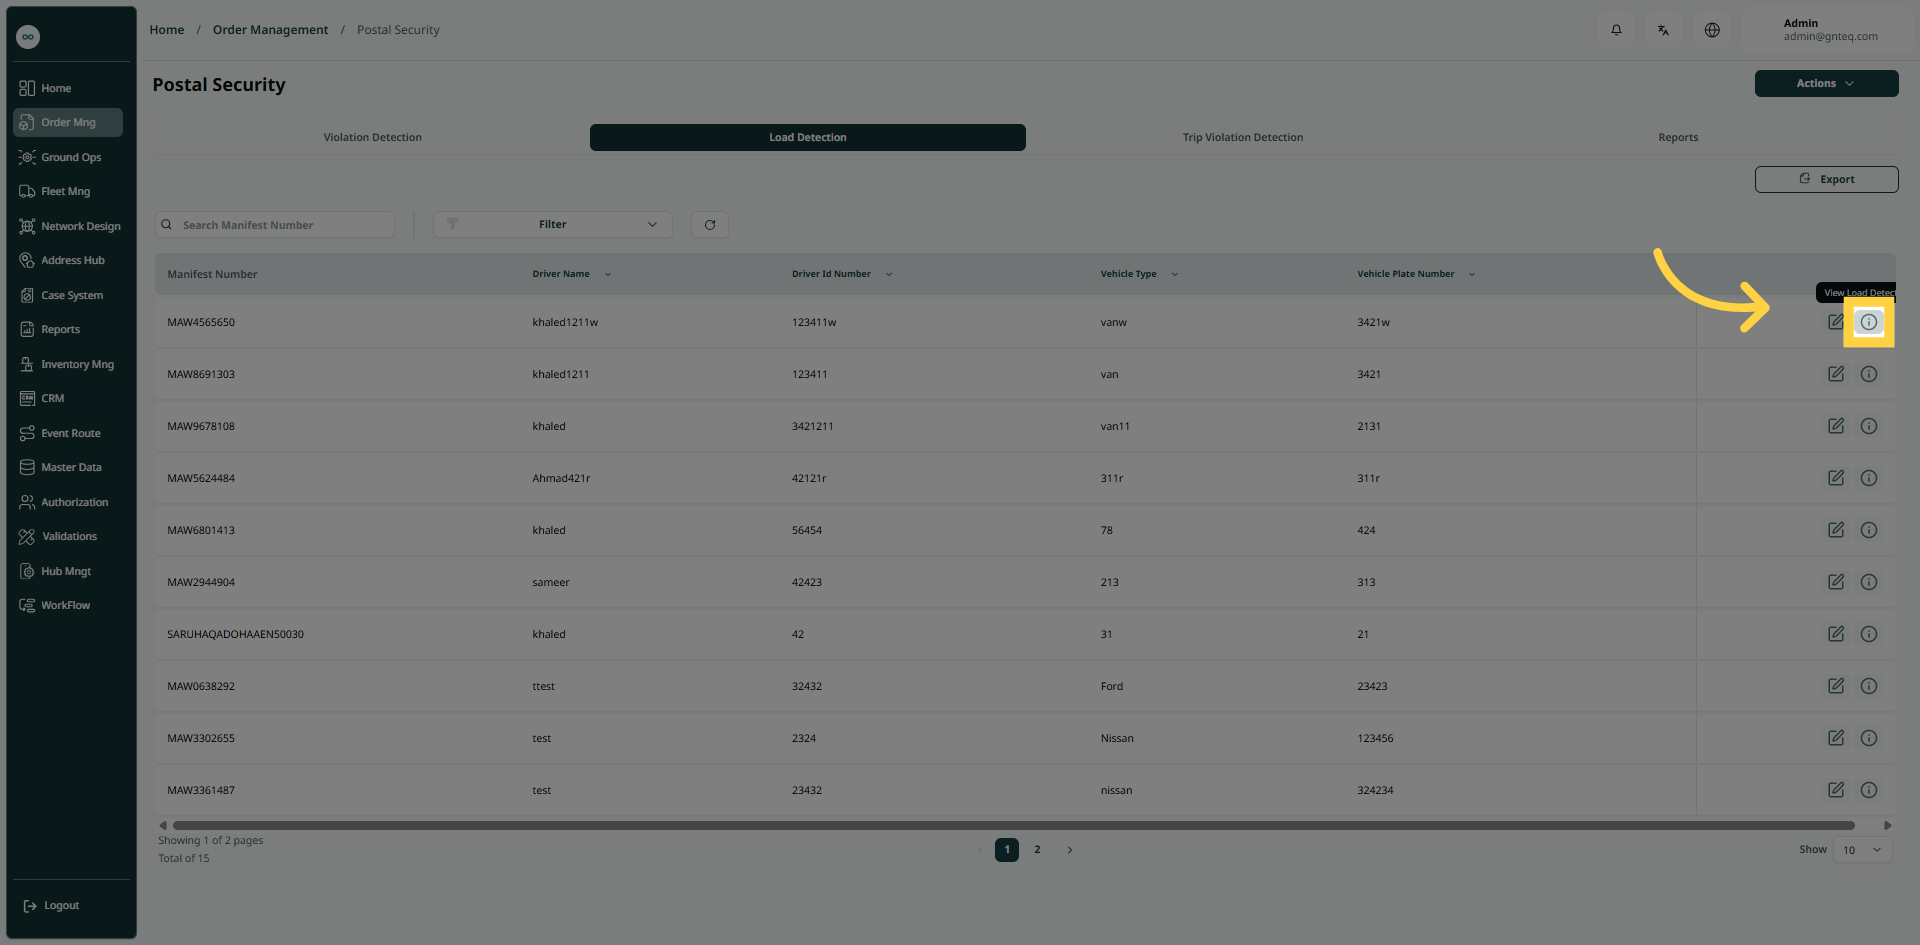
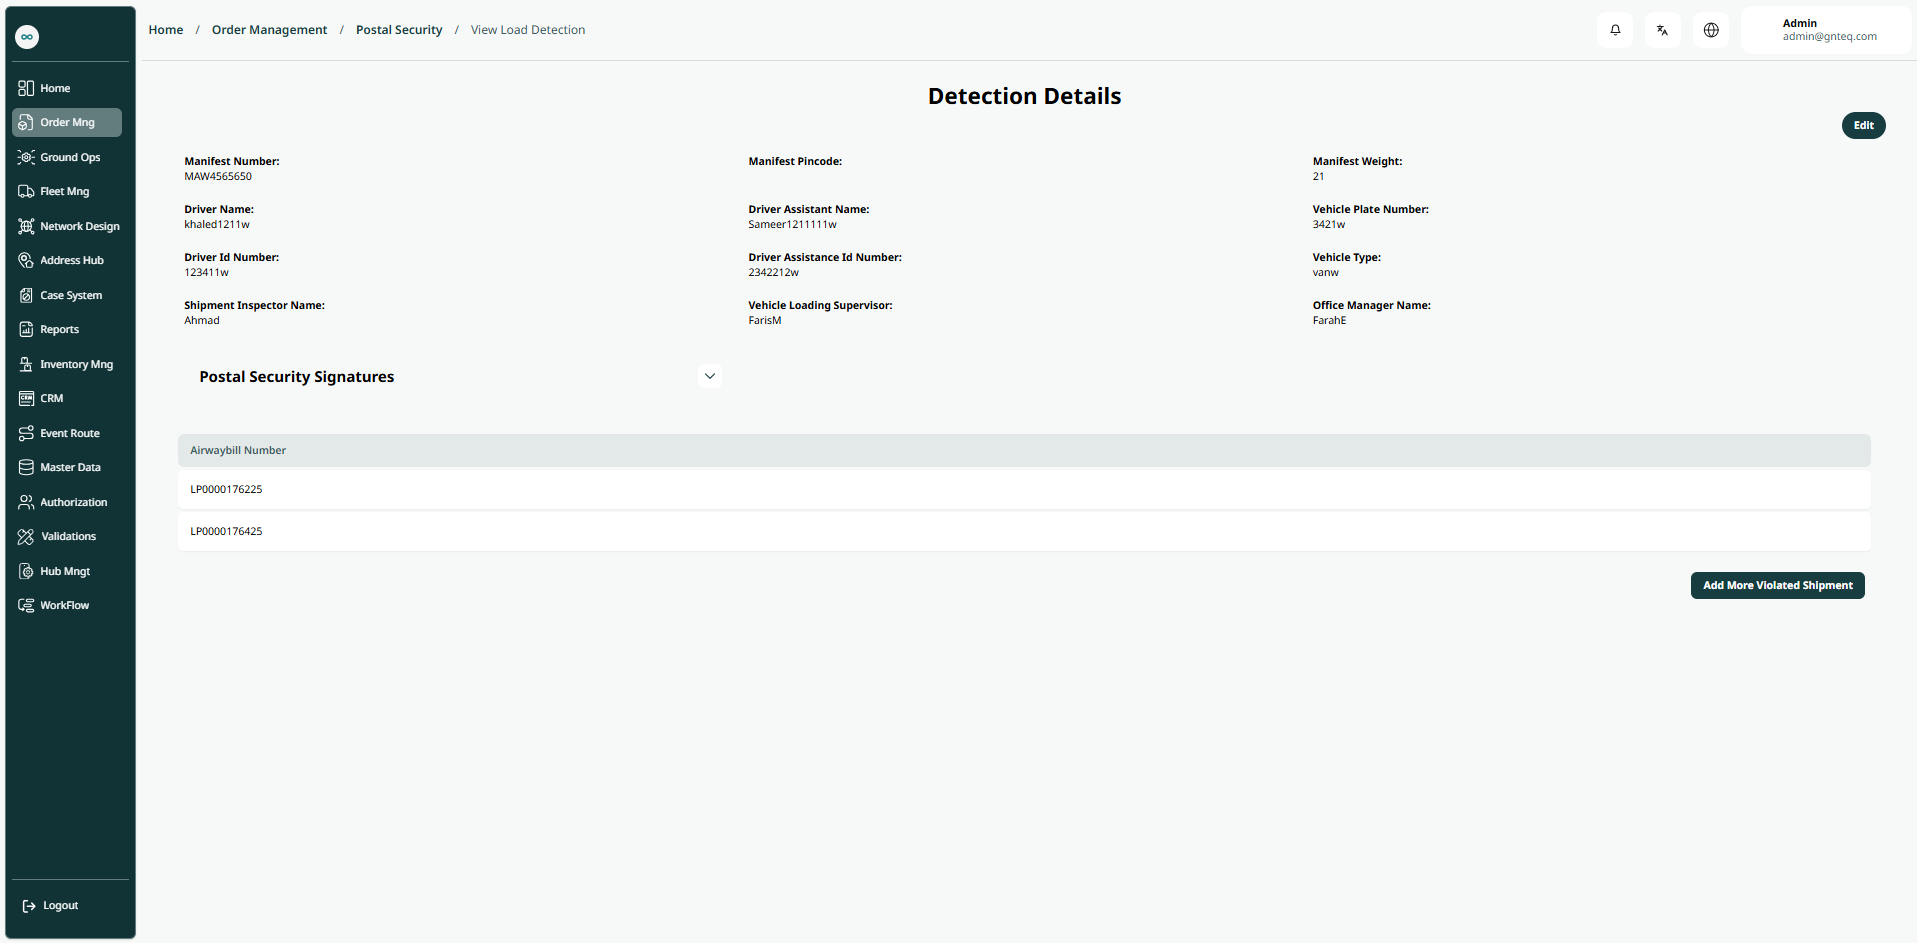
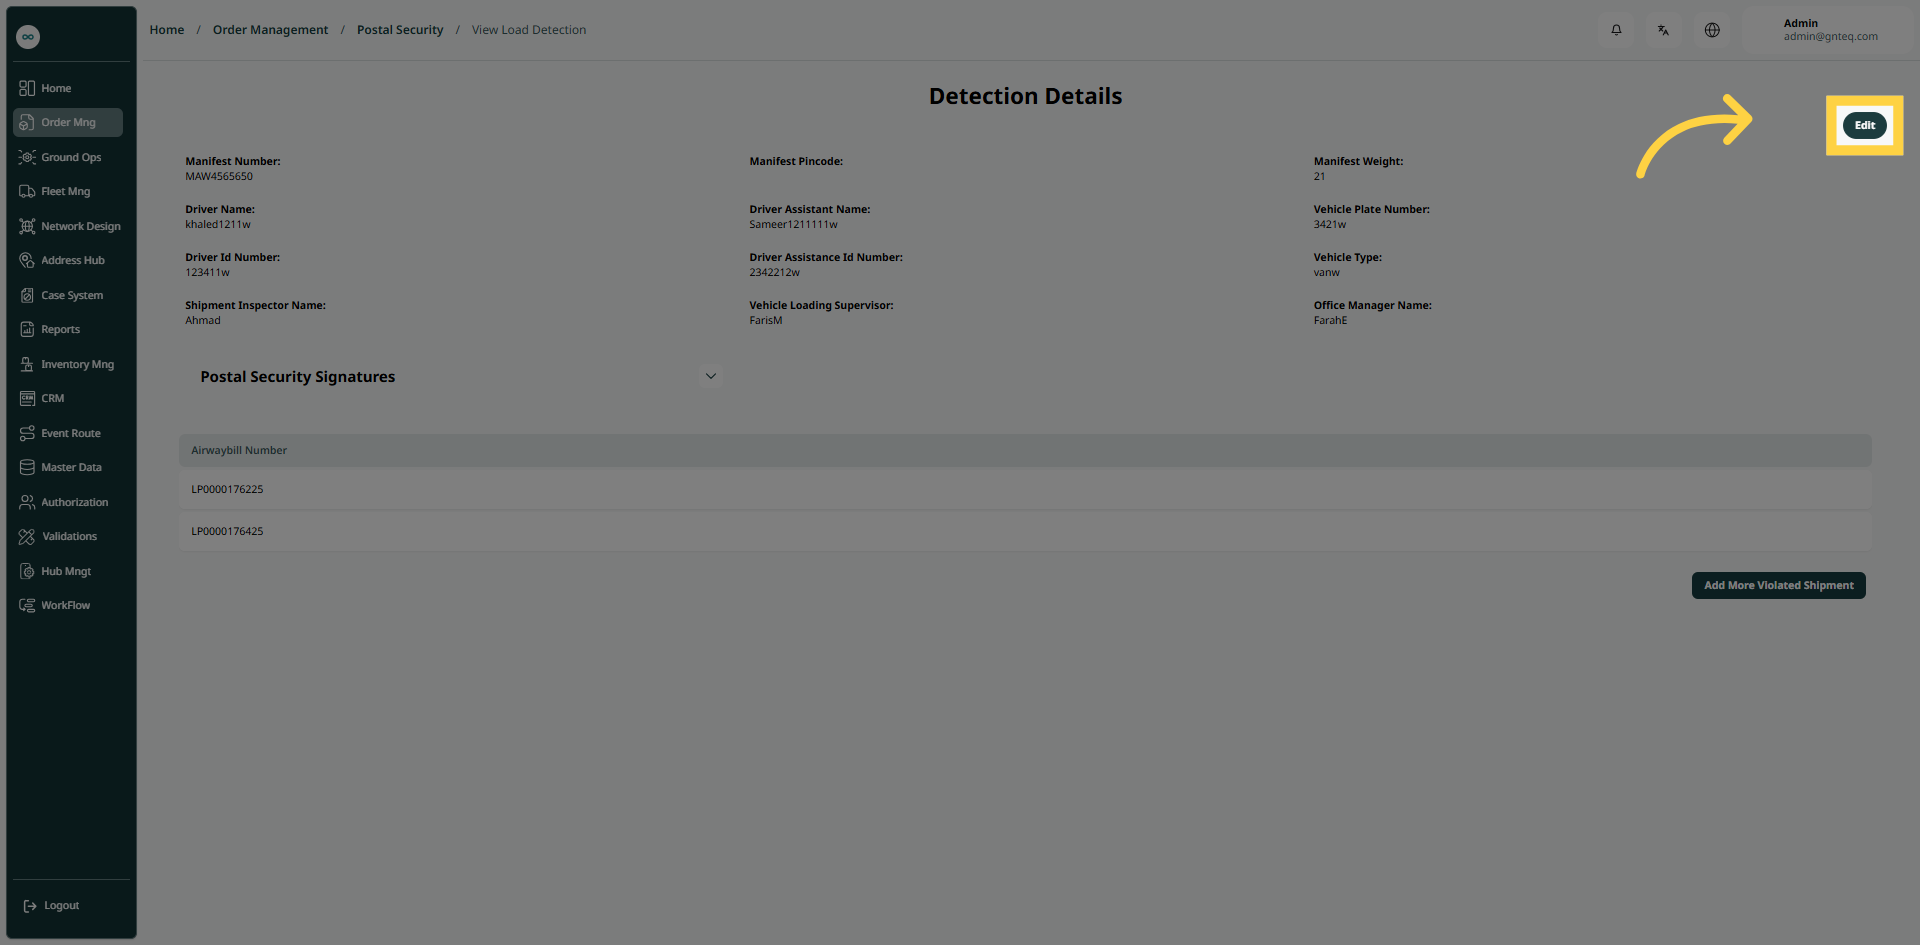
Edit: the user can edit the violation by going to the “Postal Security” screen via Order Management and clicking on View Load Detection from Actions and then clicking on Edit as follows:
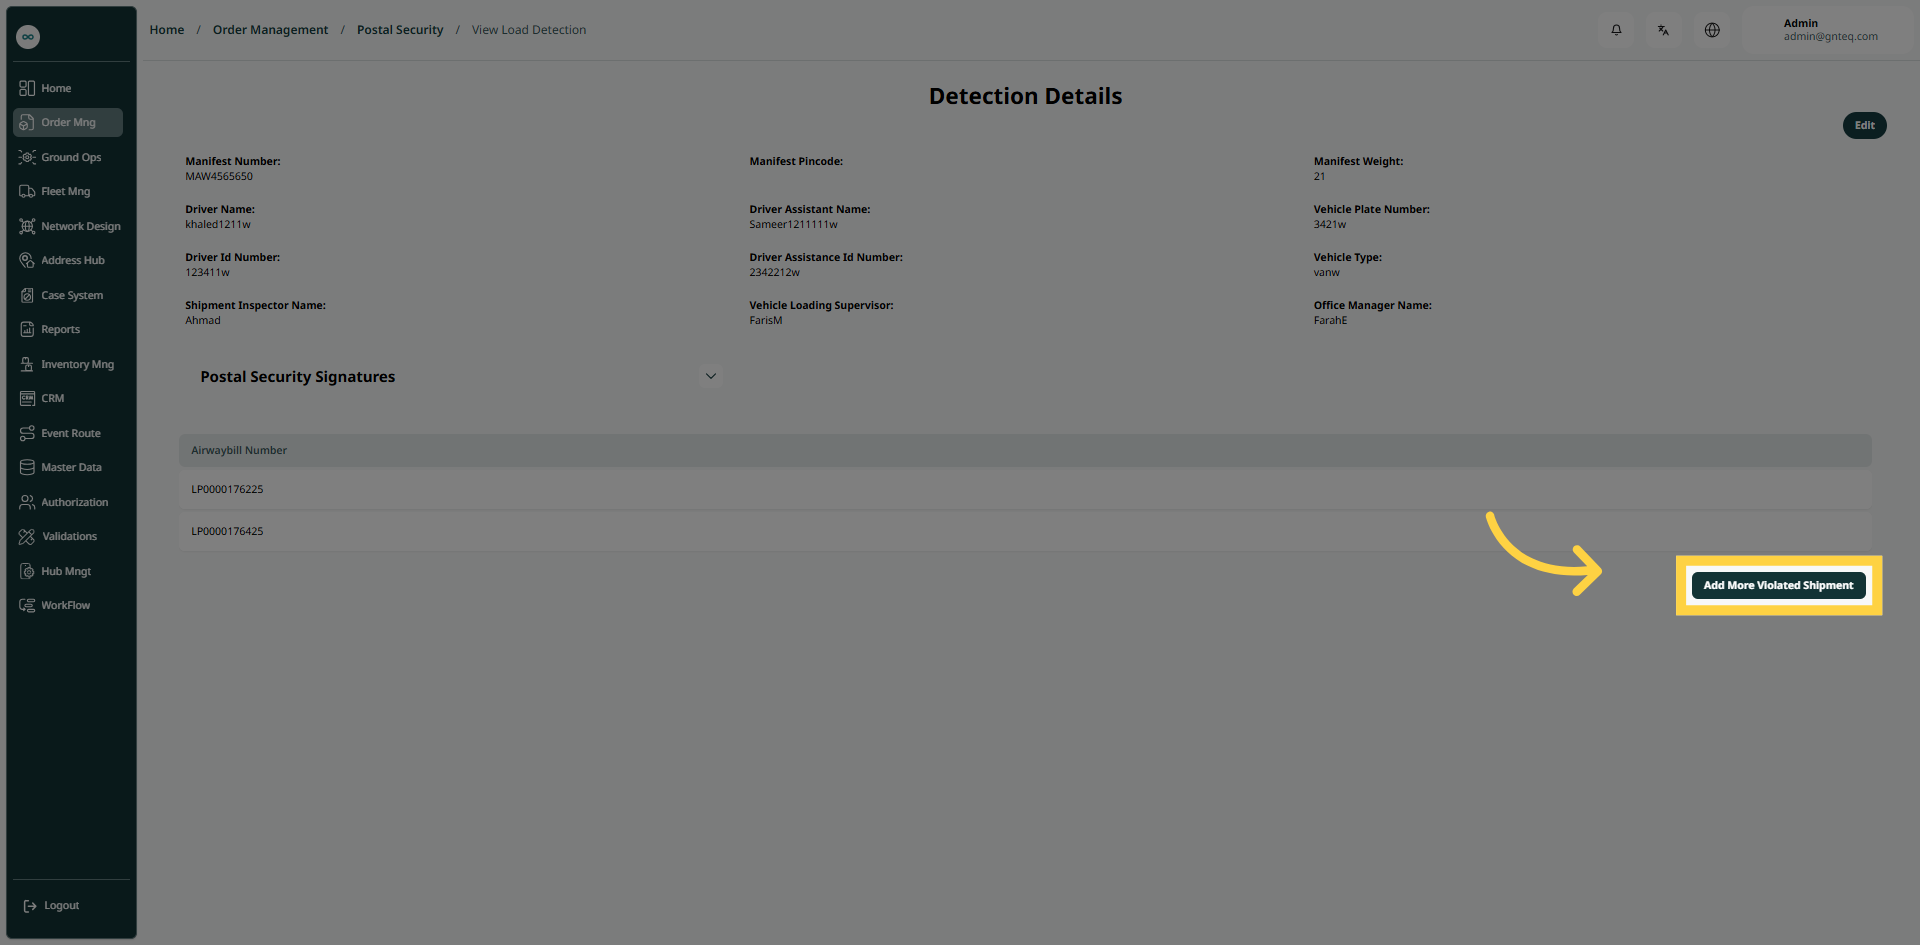
Add More Violated Shipments: the user can add more shipments by going to the "Postal Security" screen via Order Management, clicking on View Load Detection from Actions, and then clicking on Add More Violated Shipments as follows:
2.2 Add New Load Detection
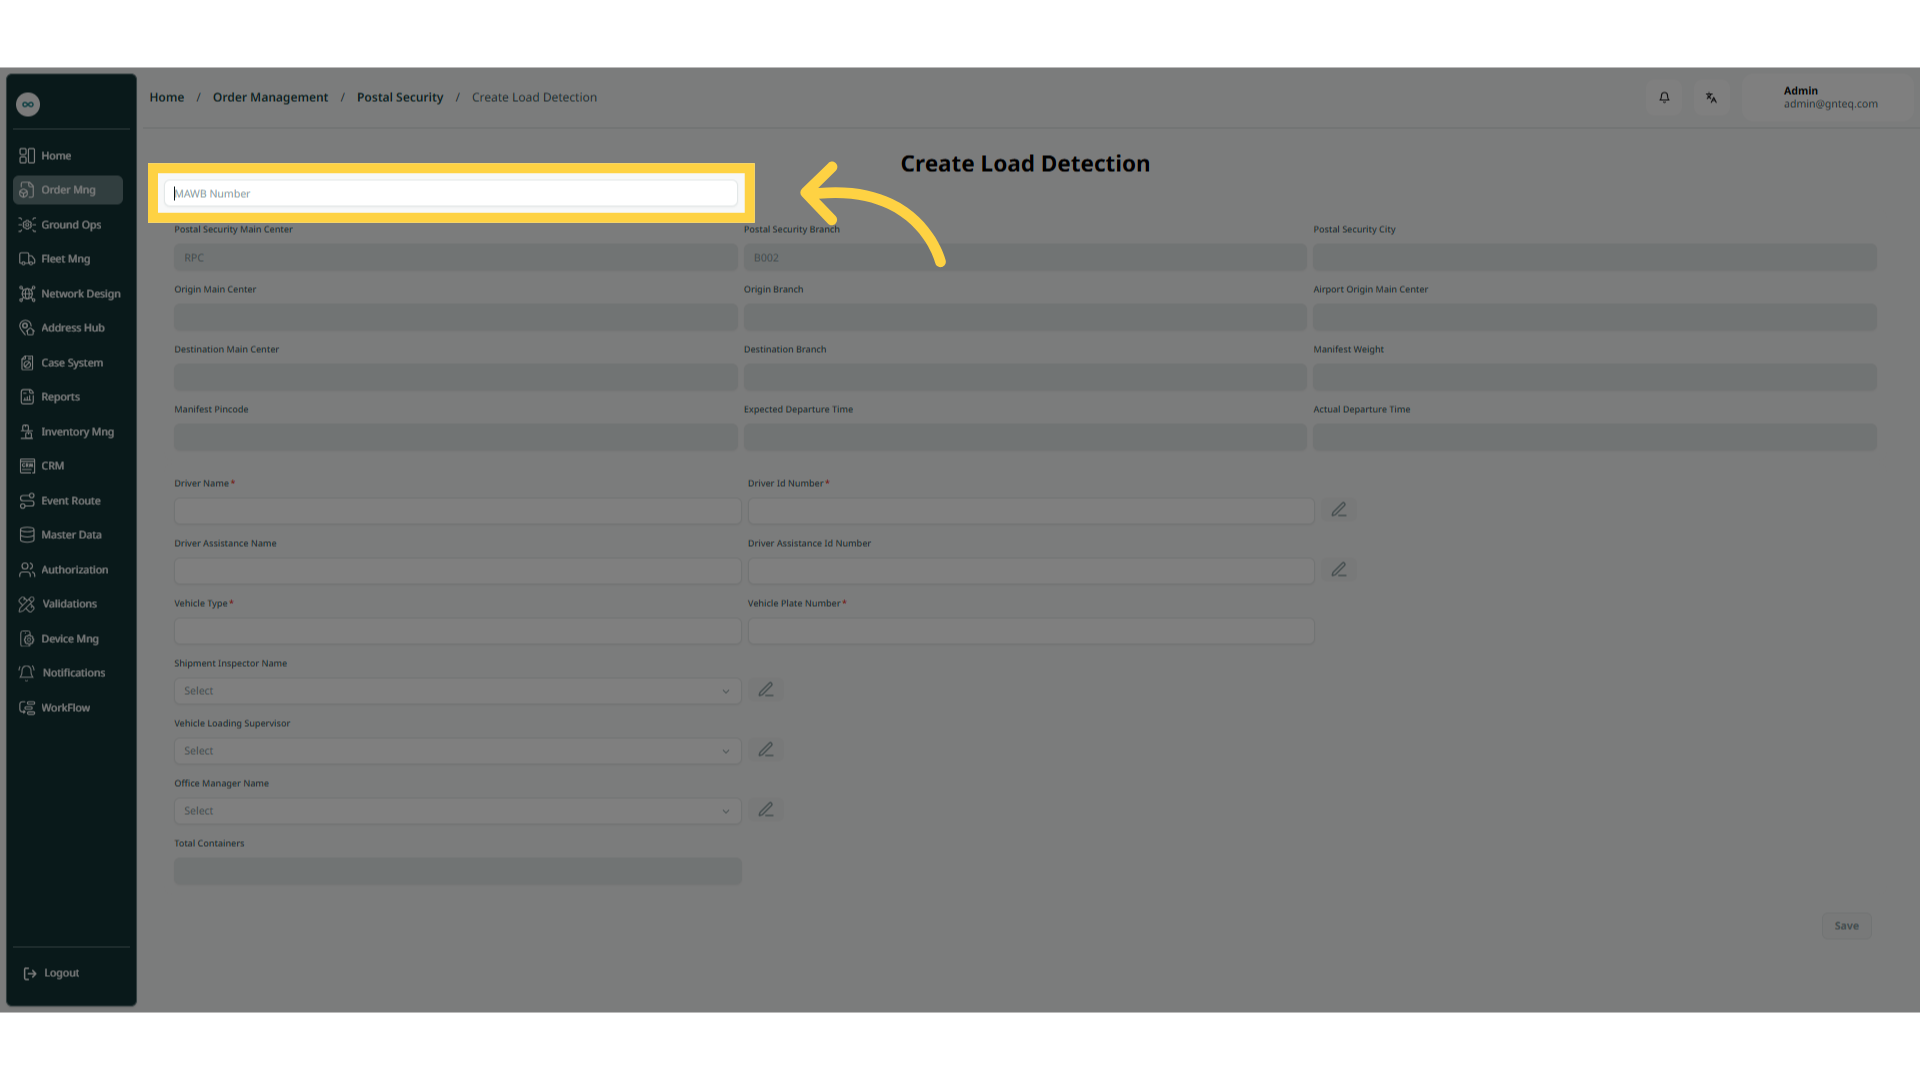
The user can create a new load detection by clicking on Actions, and selecting Load Detection by navigating to the ‘Postal Security’ screen via the Order Management.
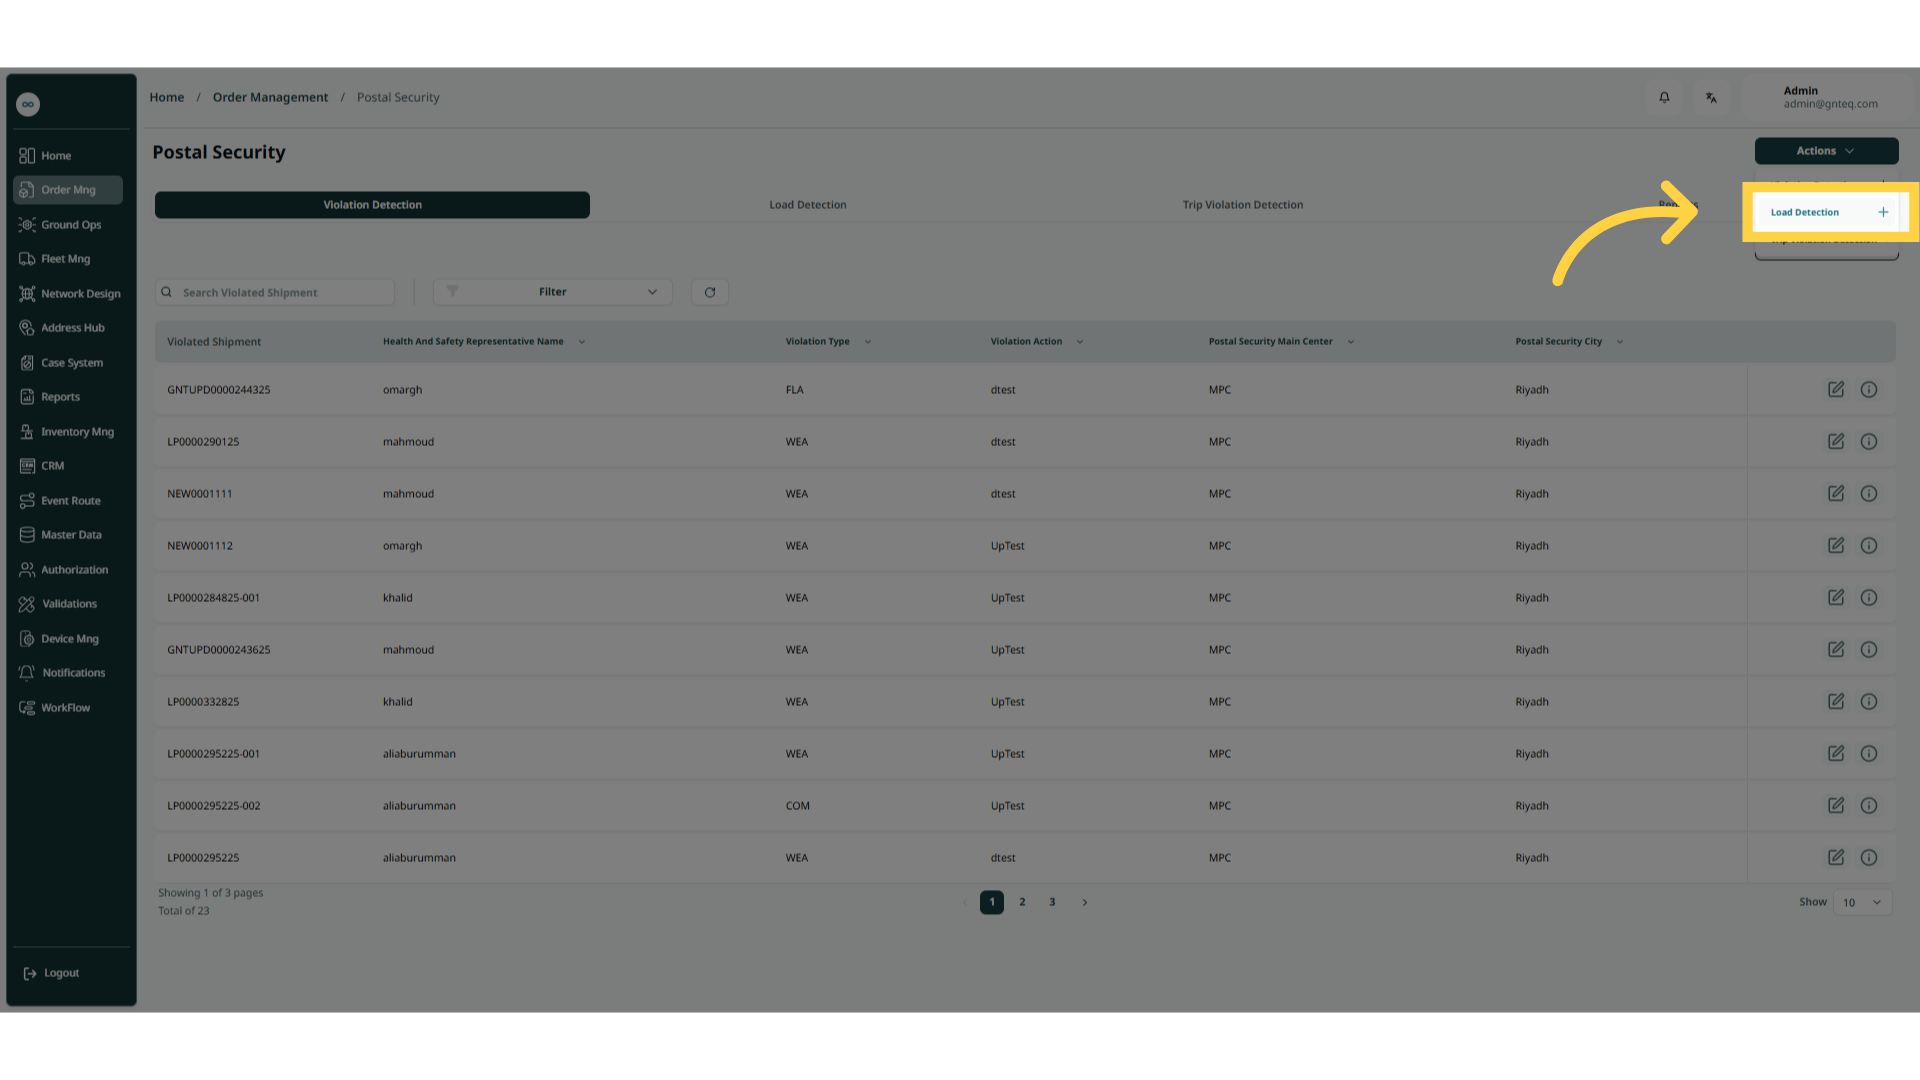
-
MAWB: this field represents the manifest number. Once entered, the manifest information will be displayed automatically.
Note: When you add the bill of lading number, the system will display the added shipment details.
By clicking Save, the system will successfully add the container.
3. Trip Violation Detection
3.1 Dashboard
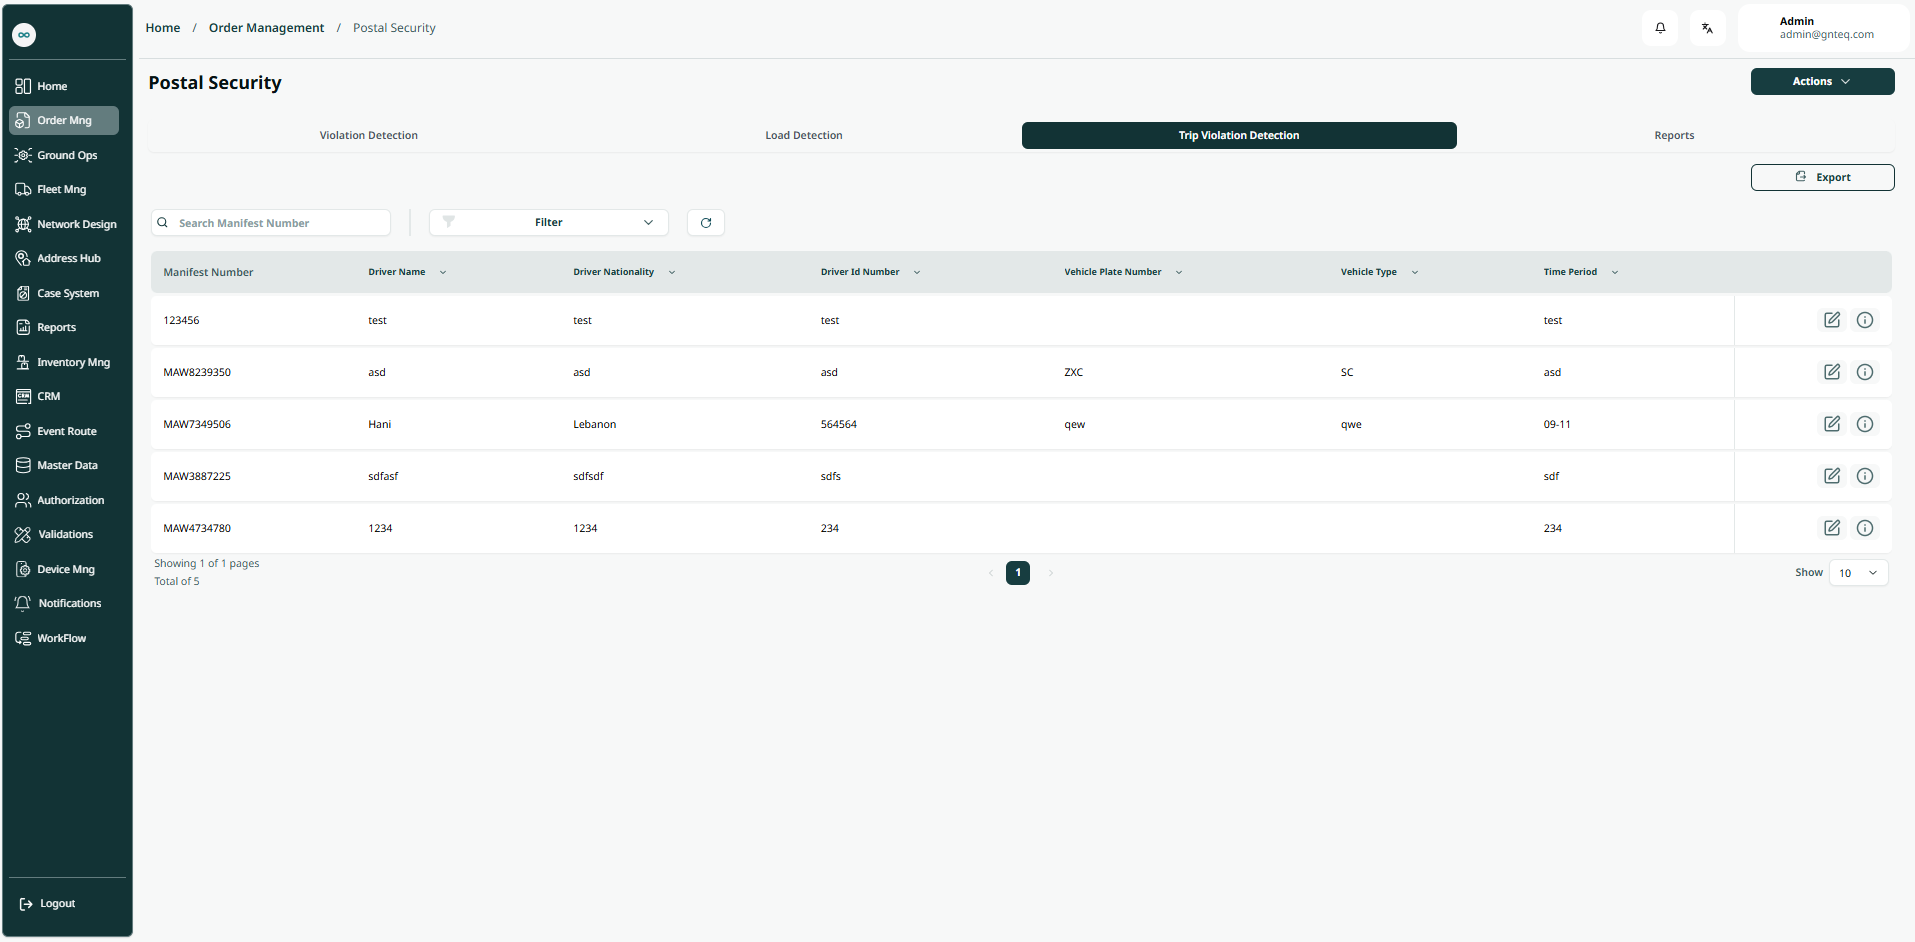
The user can view the defined trip violation detection in the system by navigating to the ‘Postal Security’ screen in the Order Management from the left navigation panel as follows, and select Trip Violation Detection:
-
Actions: the user can select a certain action from the multiple actions (Violation detection, Load detection, Trip violation detection) by clicking on “Actions”.
-
Export: the user can export the list as an Excel file by selecting the 'Export' button.
-
Filters: the user can search for the vehicle type, driver name… etc.
-
Rows Per Page: the user can select the number of items to show on each page.
-
Actions: By clicking on Actions, the user can edit the trip violation detection by going to the Edit trip violation detection section, or delete the trip violation detection.
3.1.1 Edit Information
The user can edit the trip violation detection by clicking on Edit from Actions by navigating to the ‘Postal Security’ screen via the Order Management.
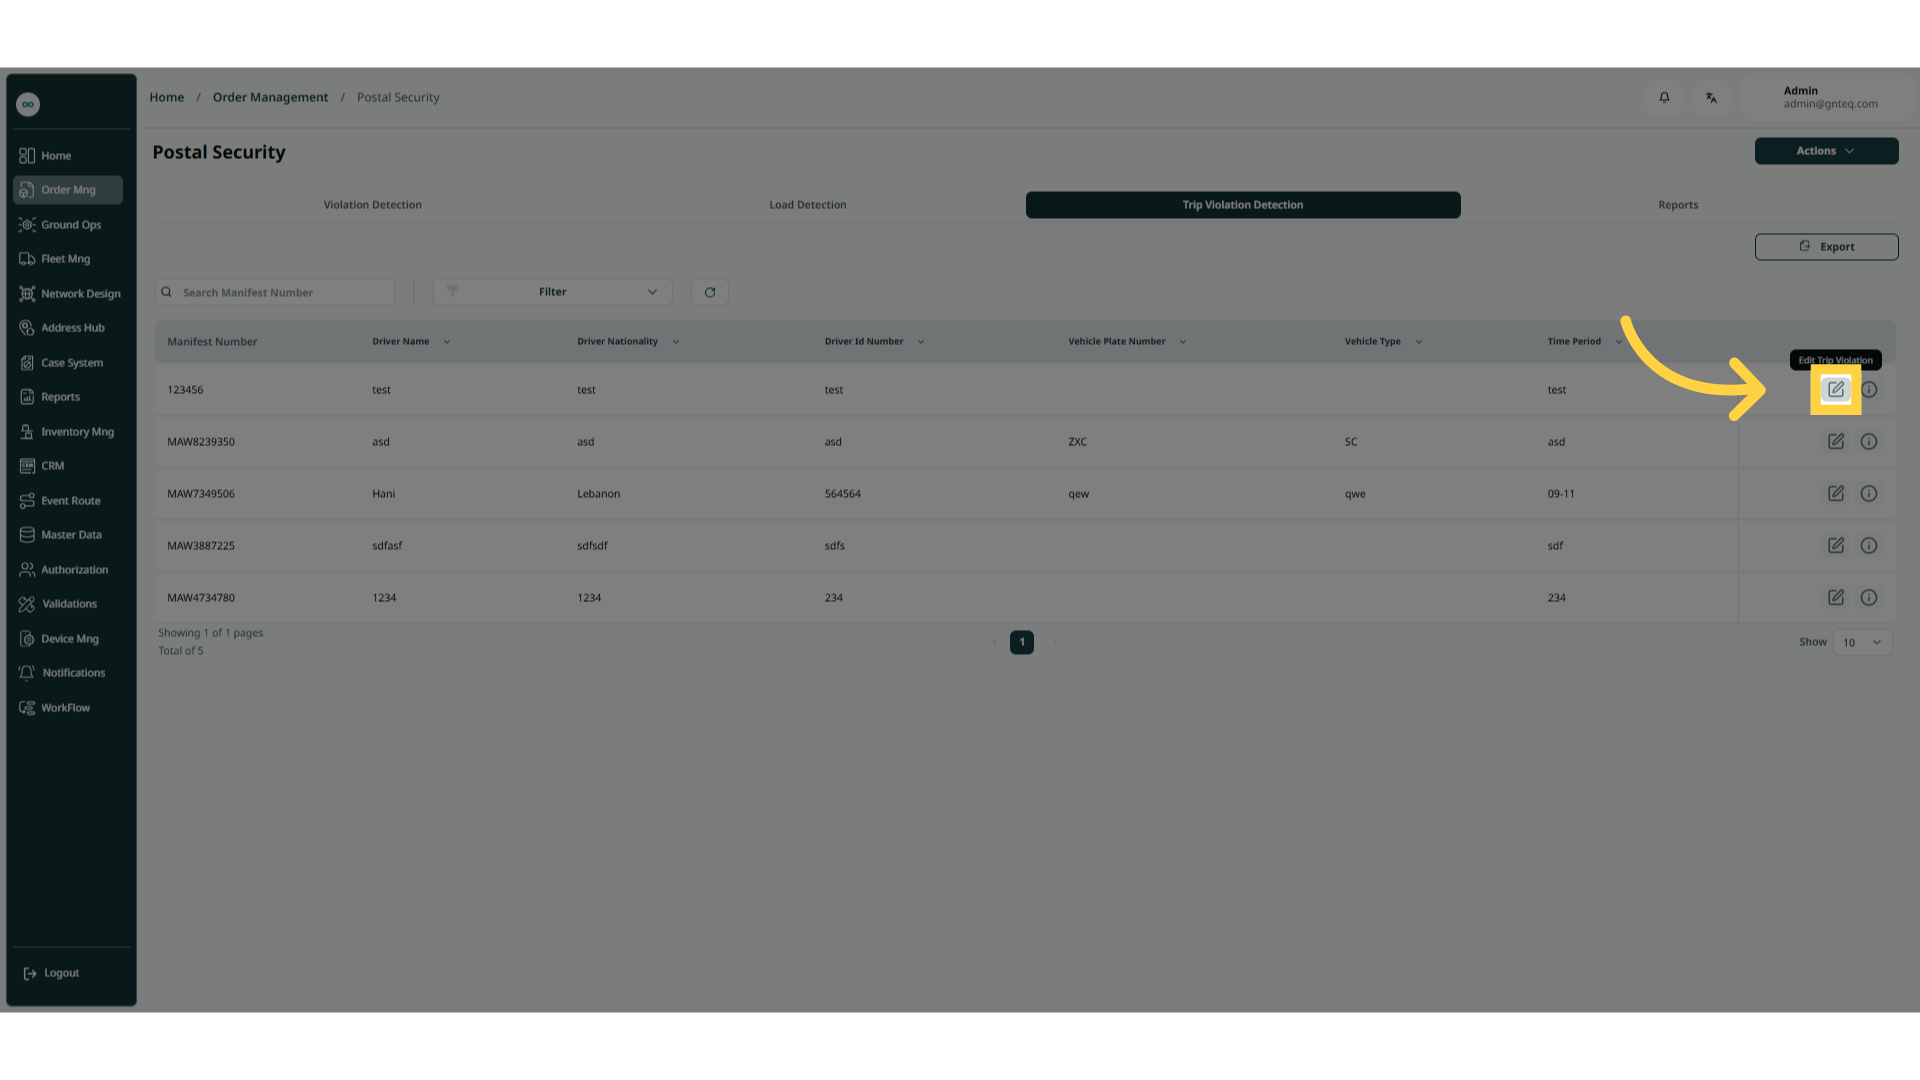
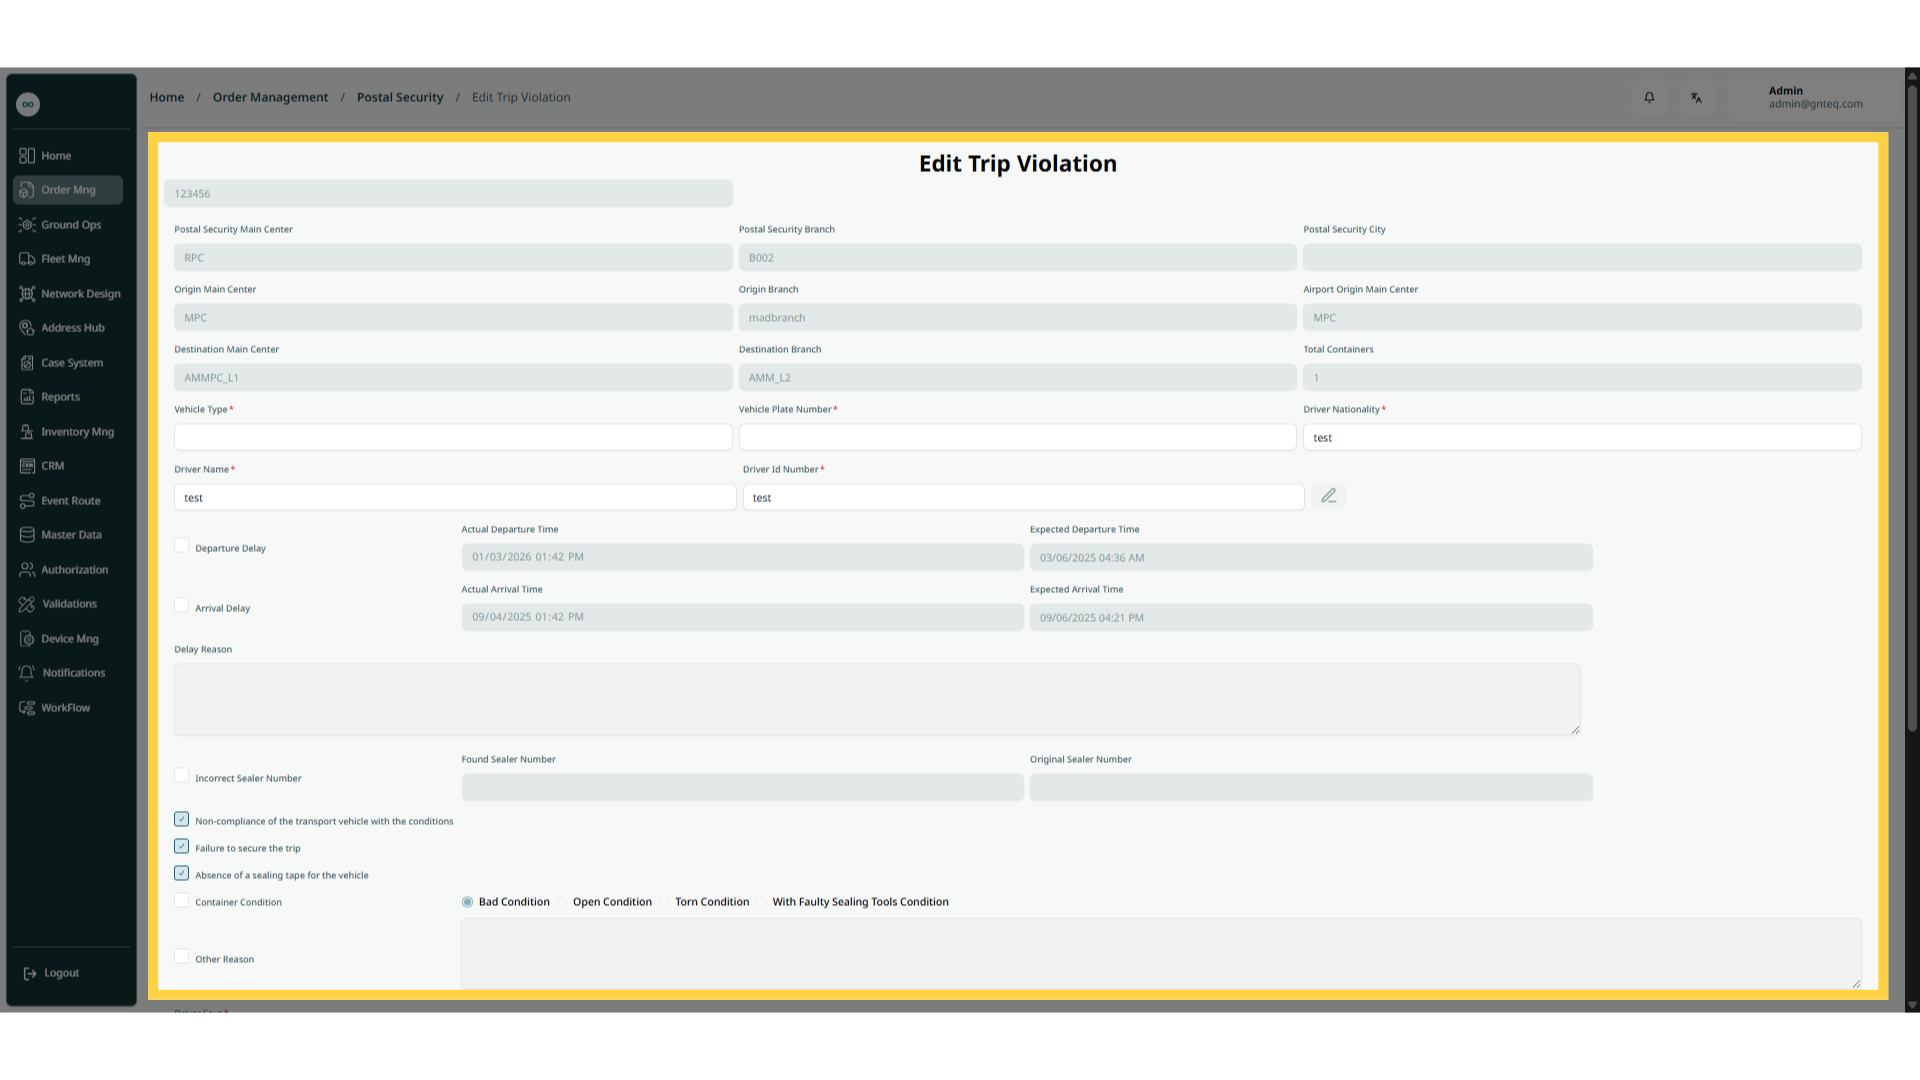
By clicking on Save, the information will be updated successfully.
3.1.2 View Details
The user can view details of the trip violation detection by clicking on Edit from Actions, by navigating to the ‘Postal Security’ screen via Order Management.
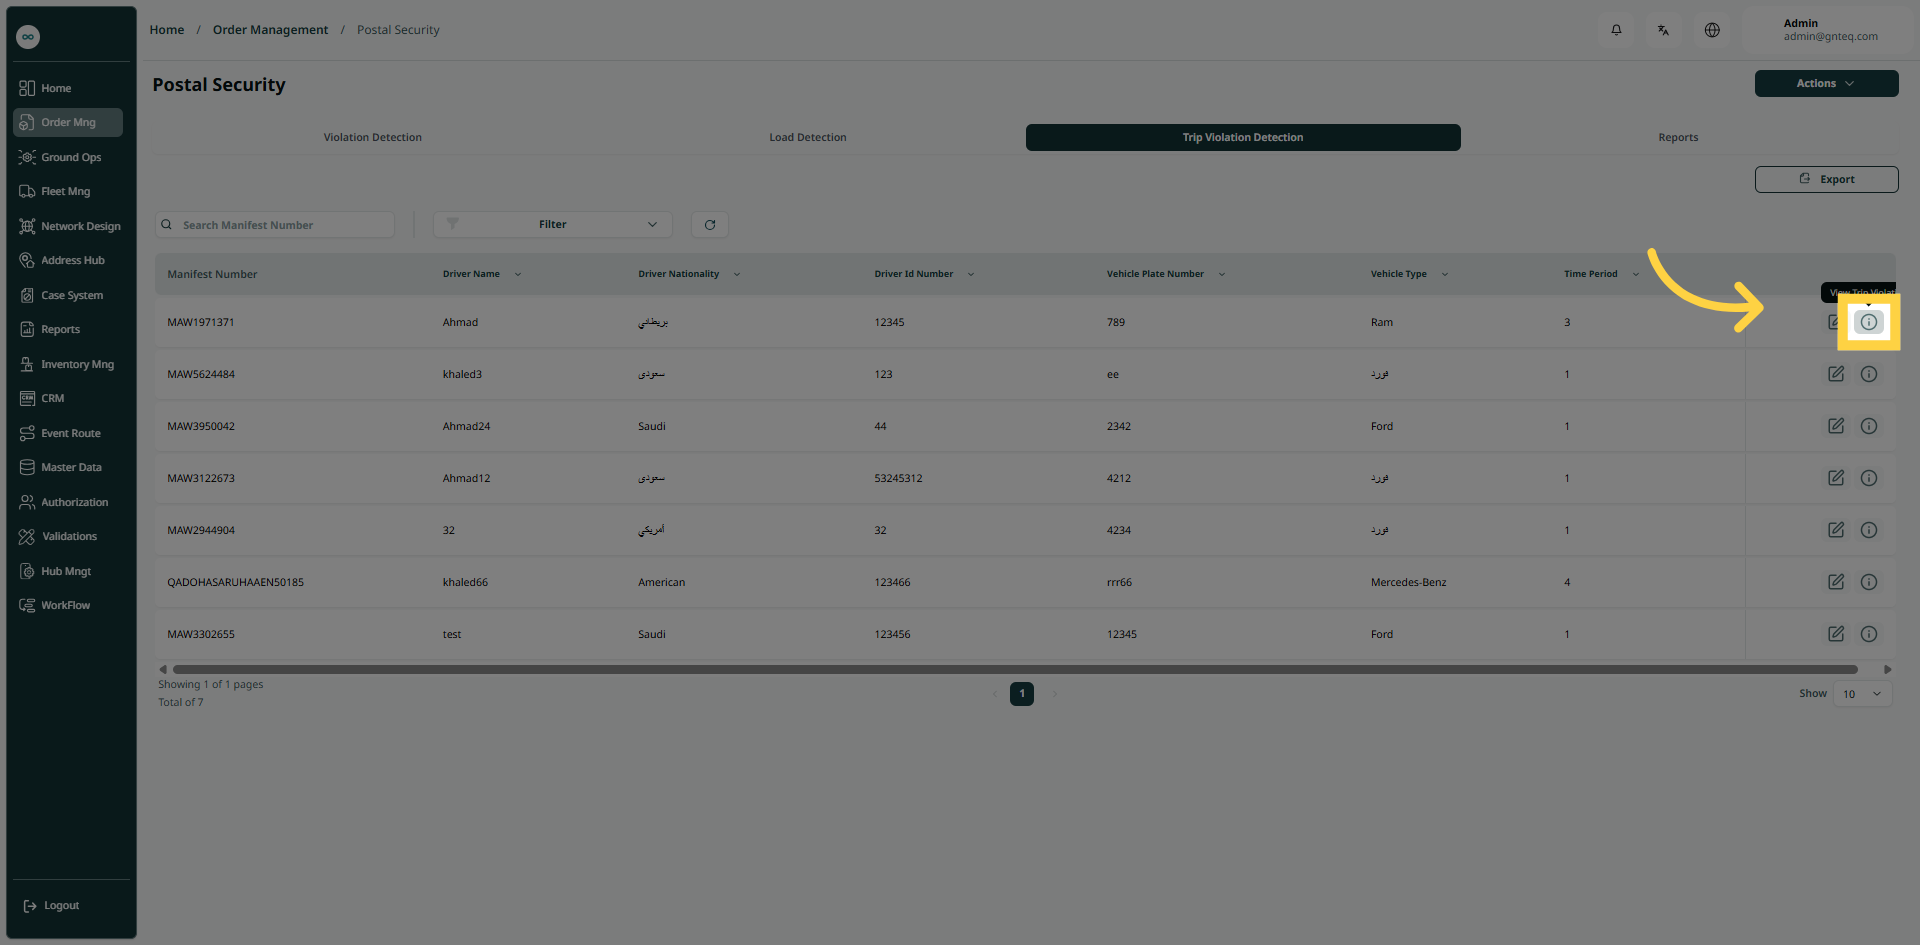
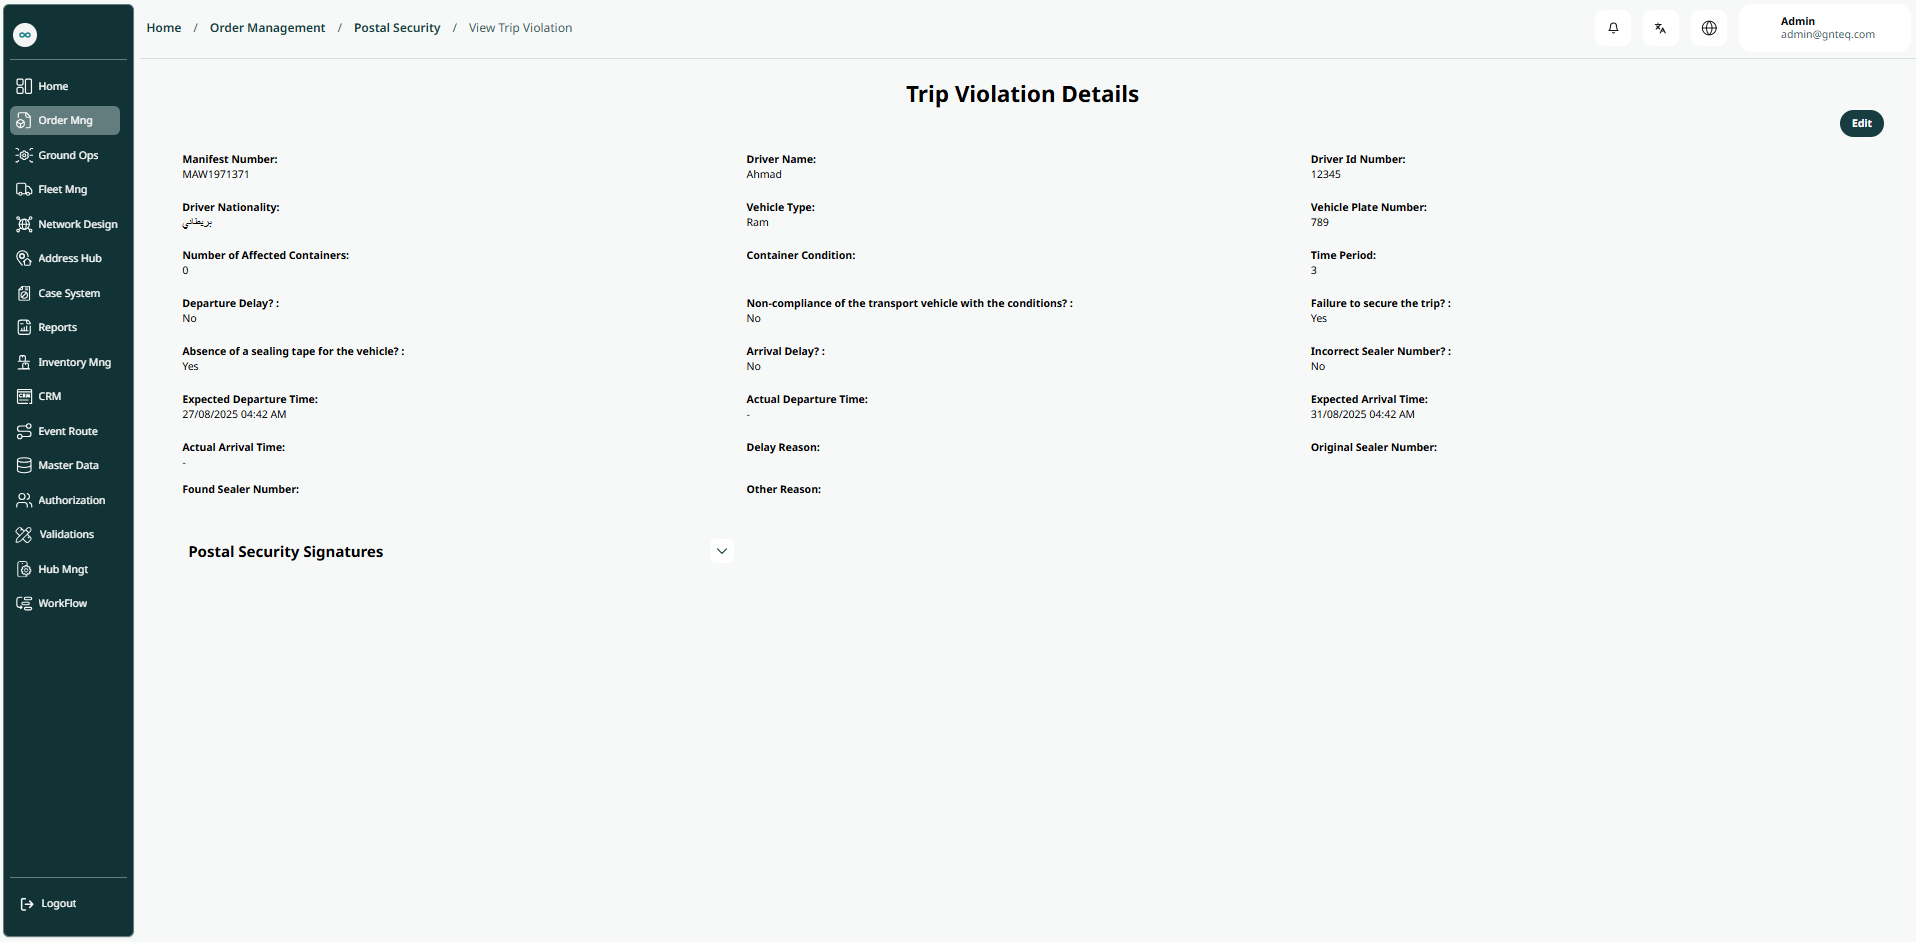
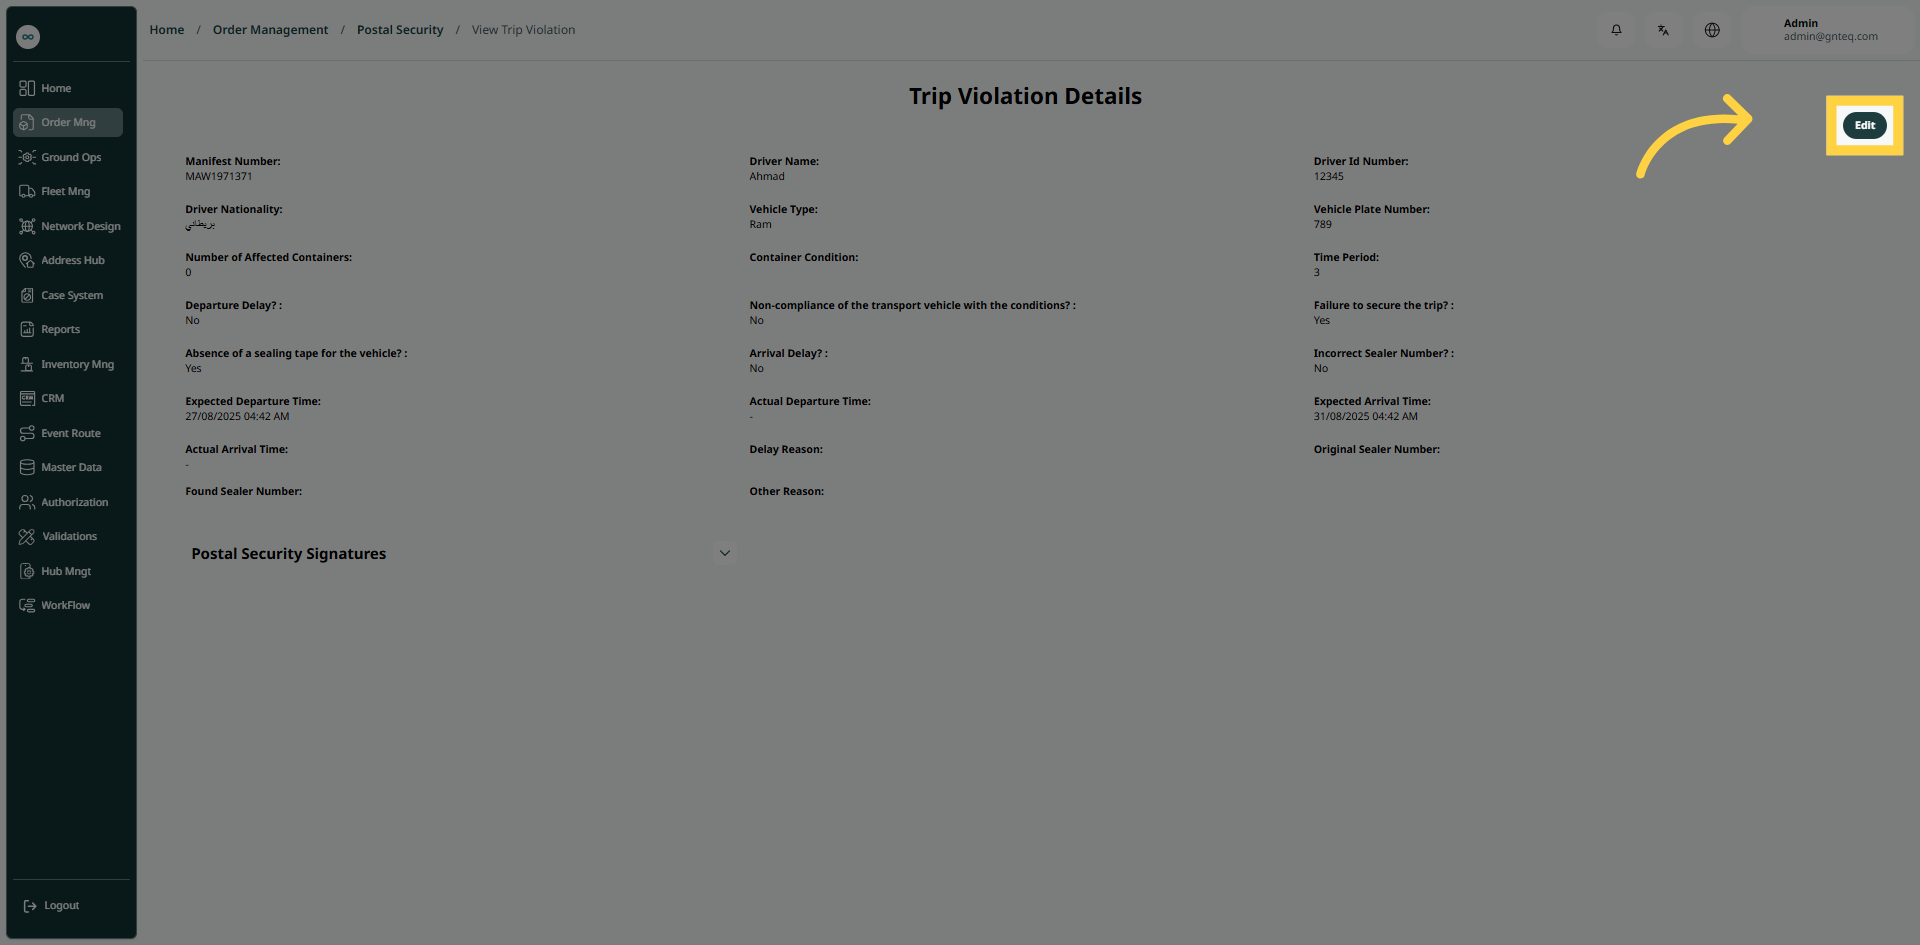
Edit: the user can edit the trip violation by going to the “Postal Security” screen via Order Management and clicking on View Trip Violation Detection from Actions and then clicking on Edit as follows:
3.2 Add New Trip Violation Detection
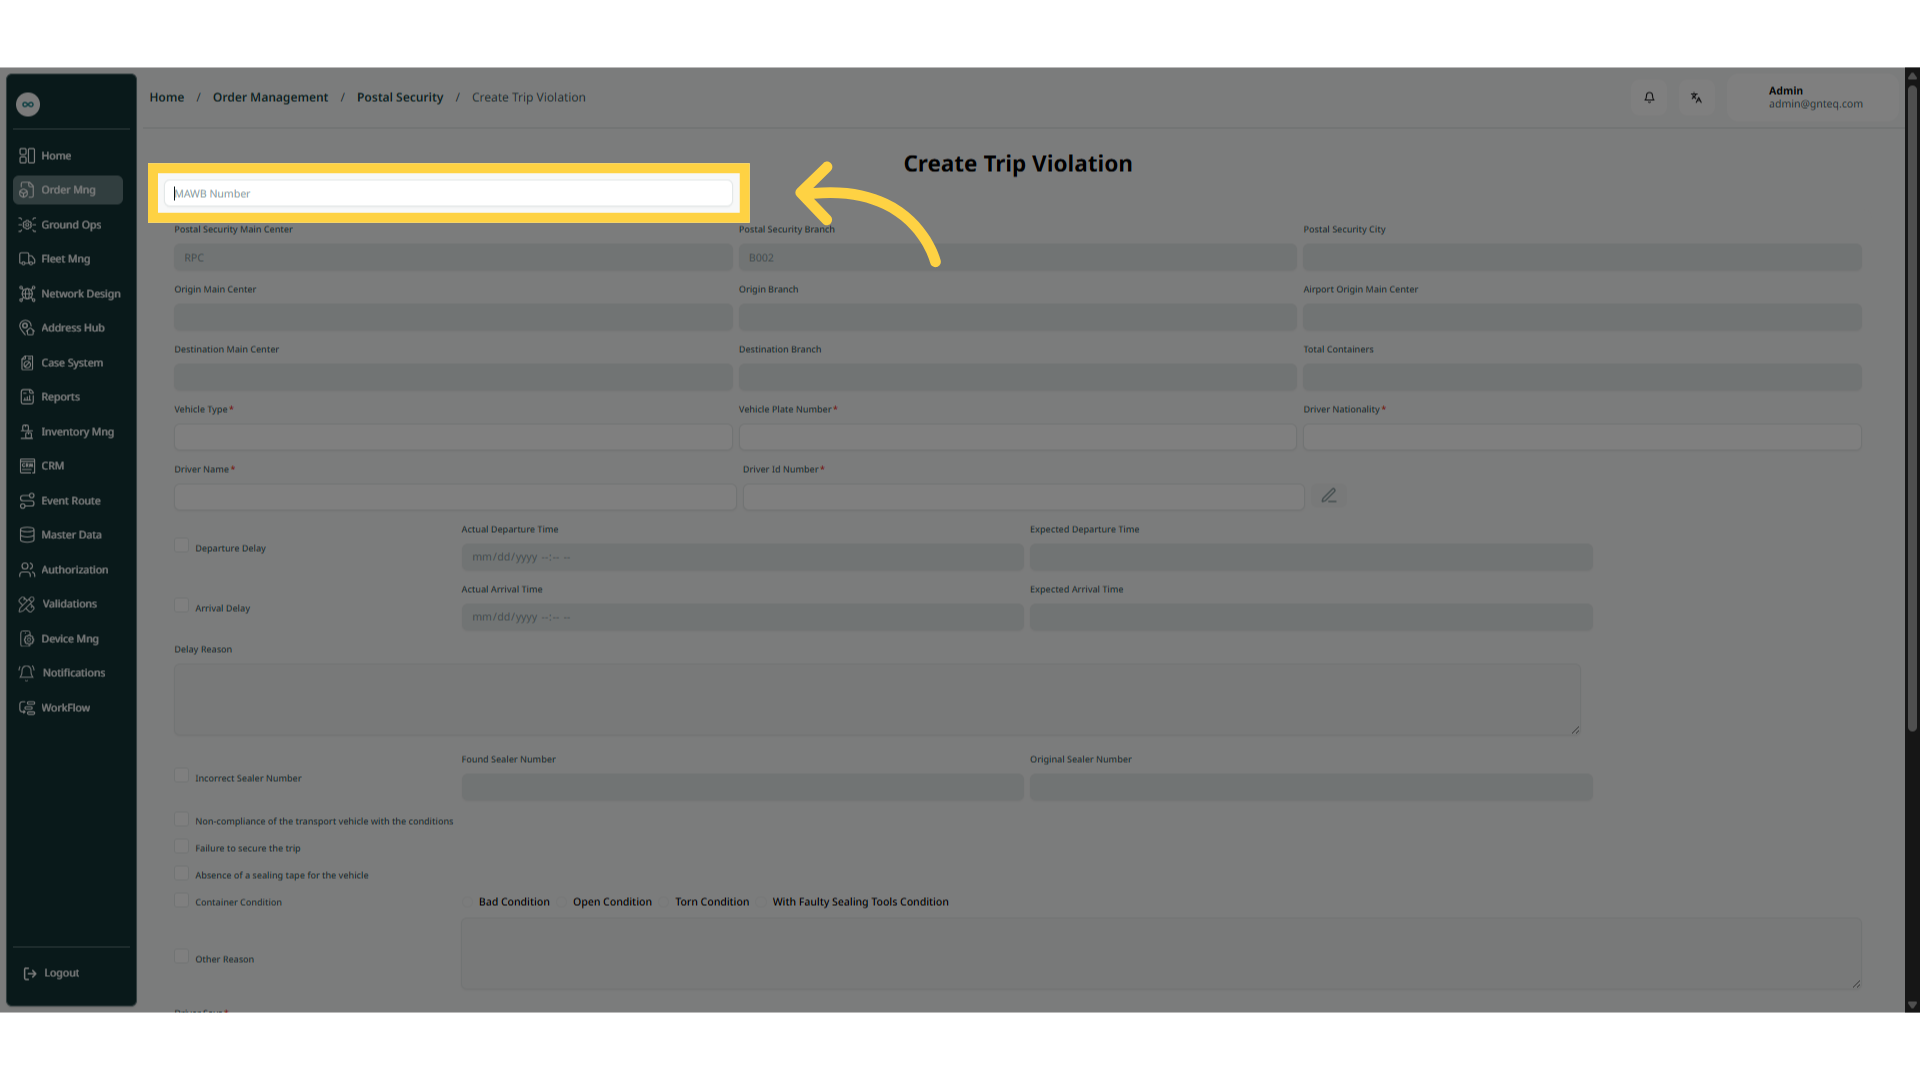
The user can create a new trip violation detection by clicking on Actions and selecting Trip Violation Detection by navigating to the ‘Postal Security’ screen via the Order Management.
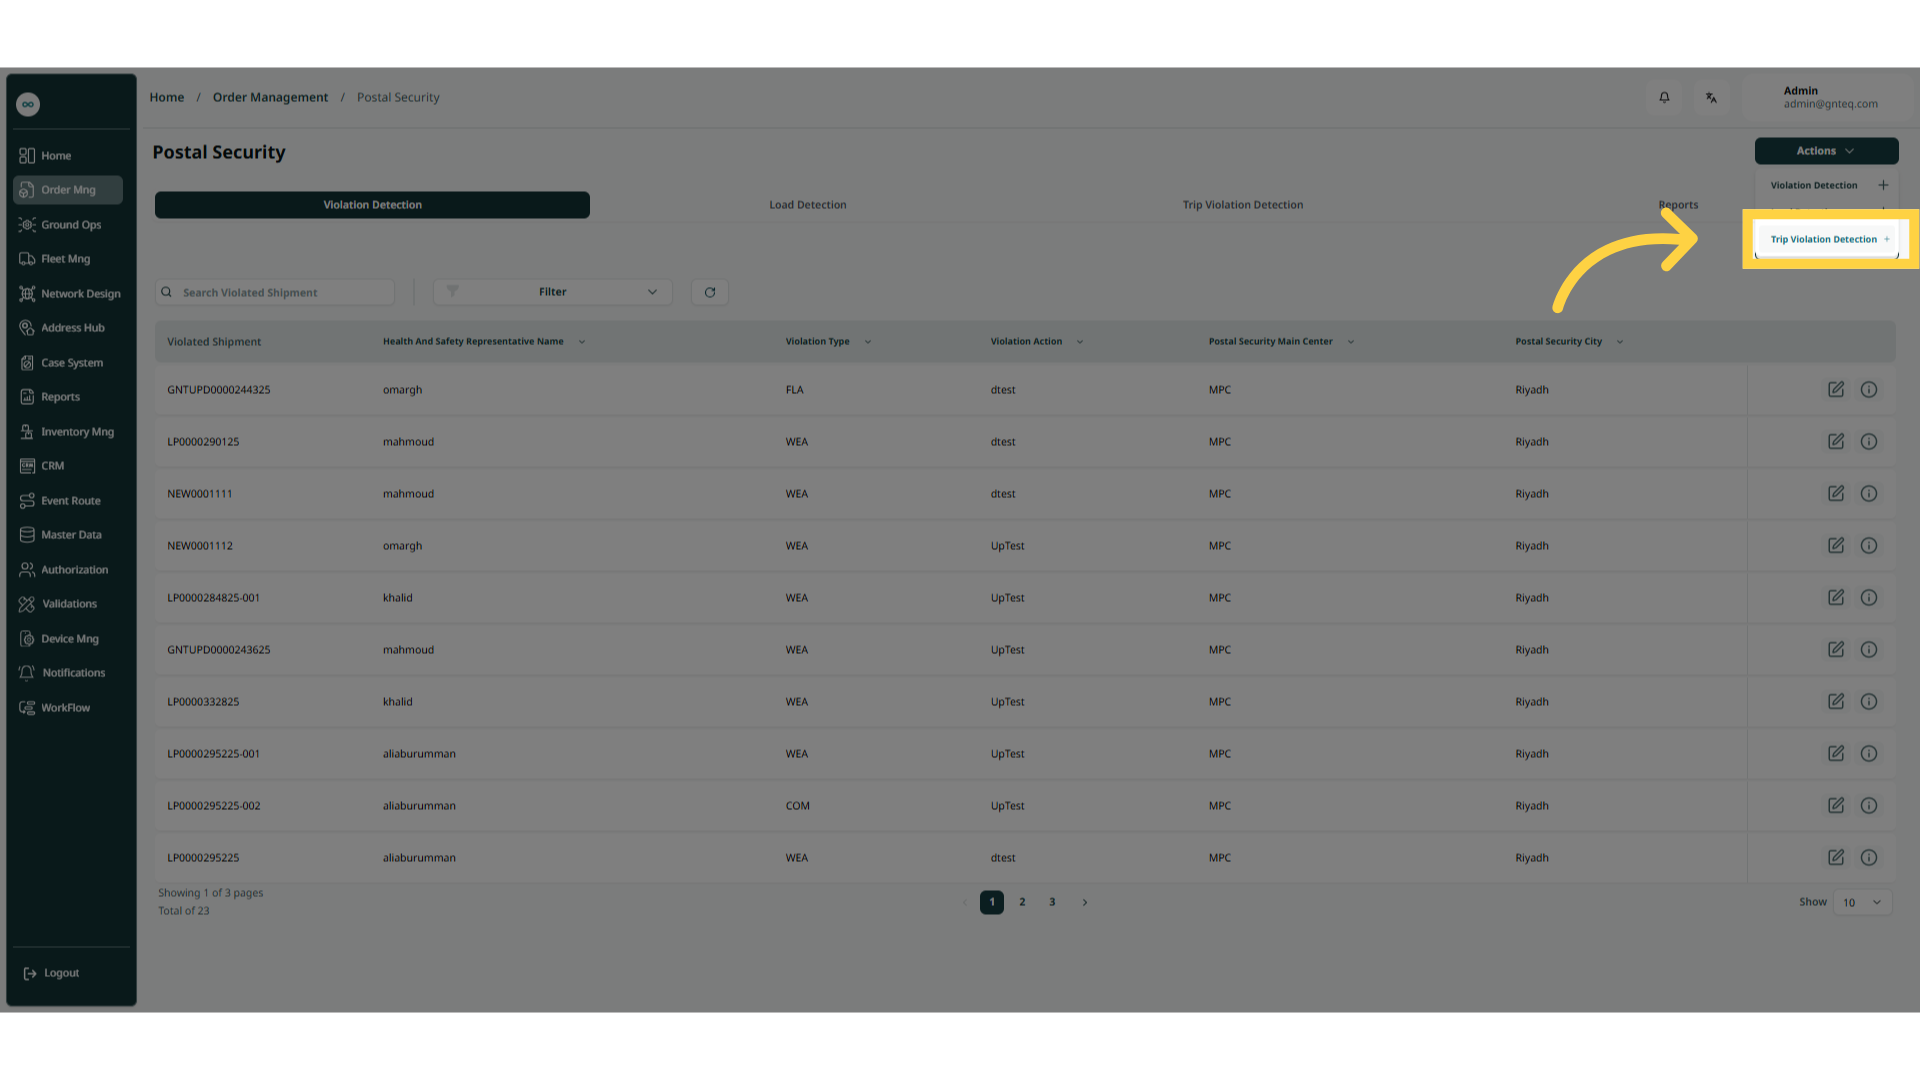
-
MAWB: this field represents the manifest number. Once entered, the manifest information will be displayed automatically.
-
Note: When the shipment number is added, the system will automatically fill in the shipment details available in the system.
-
Add Attachment: The user can add an attachment to the violation by navigating to the “Postal Security” screen via Order Management, clicking “Violation Detection” from Actions, and then clicking “Add Attachment.”
By clicking Next, the system will successfully add the shipment.
4. Reports
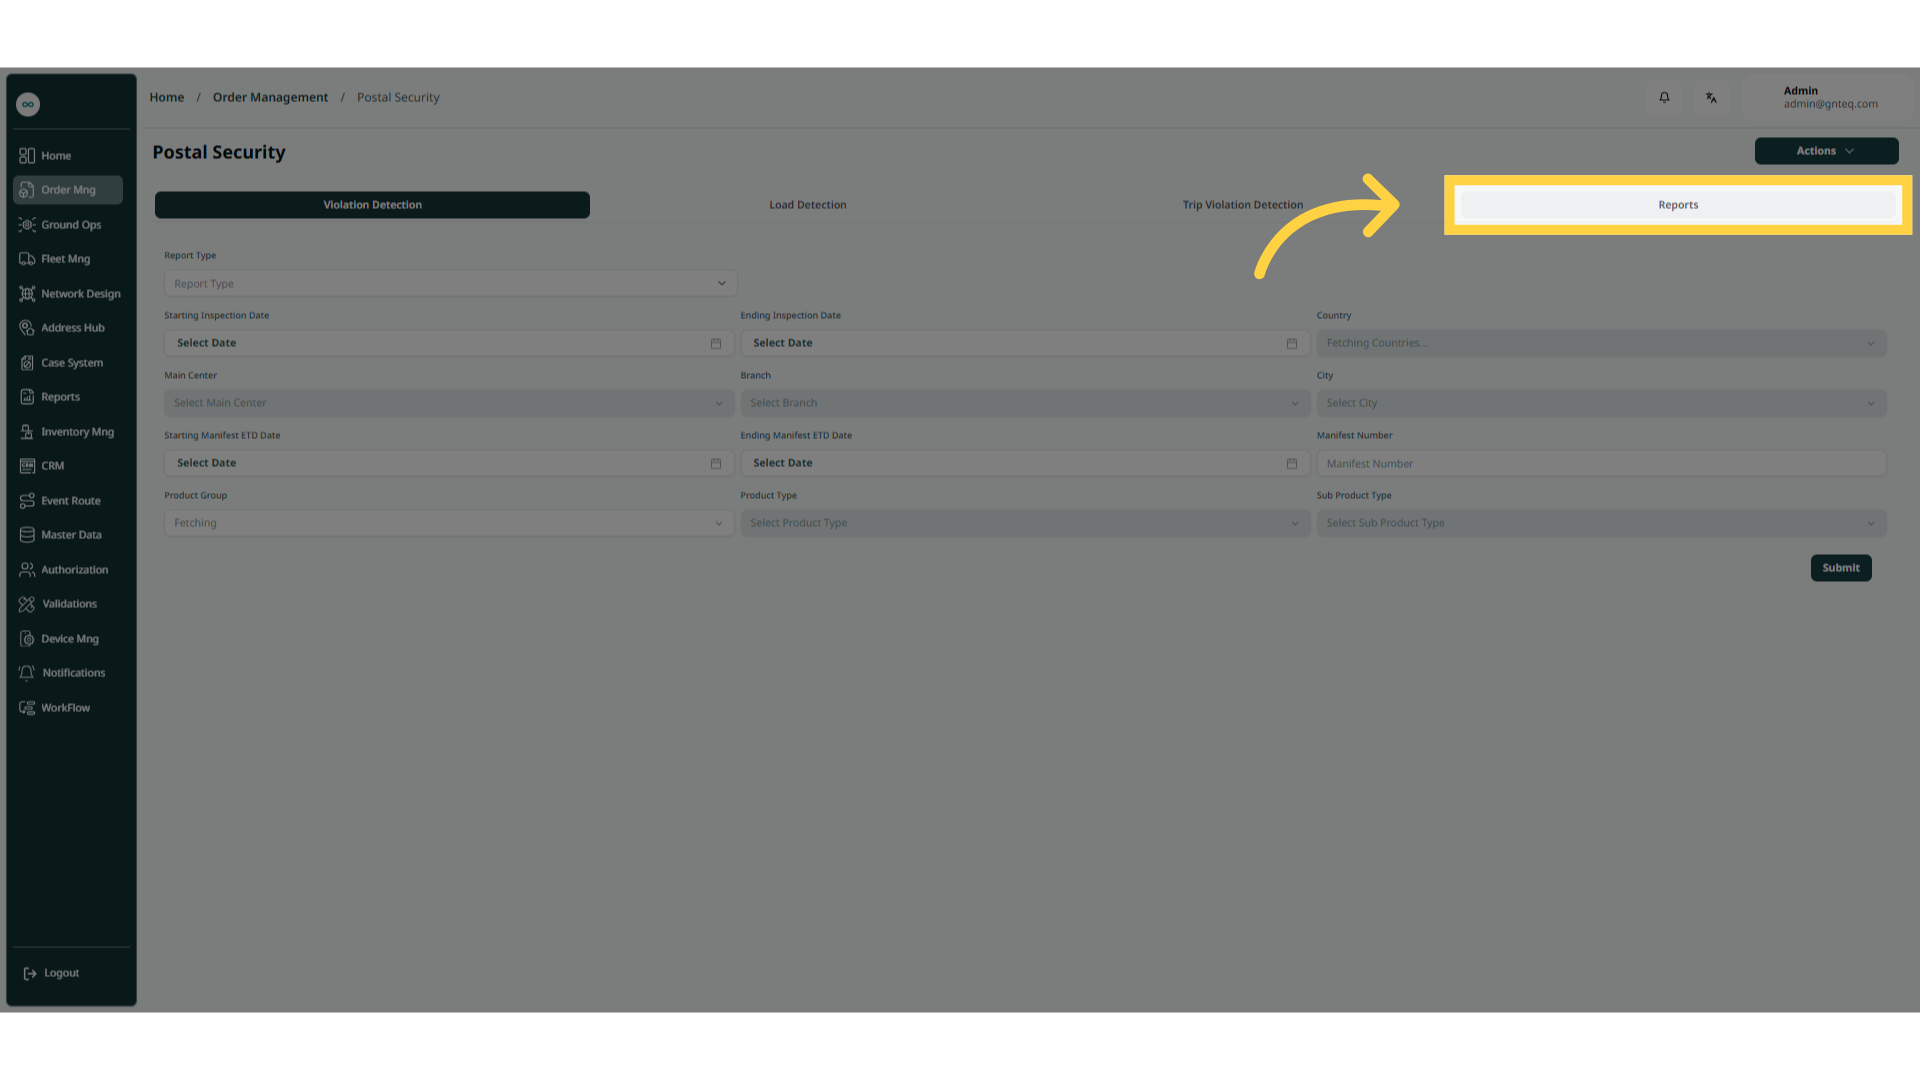
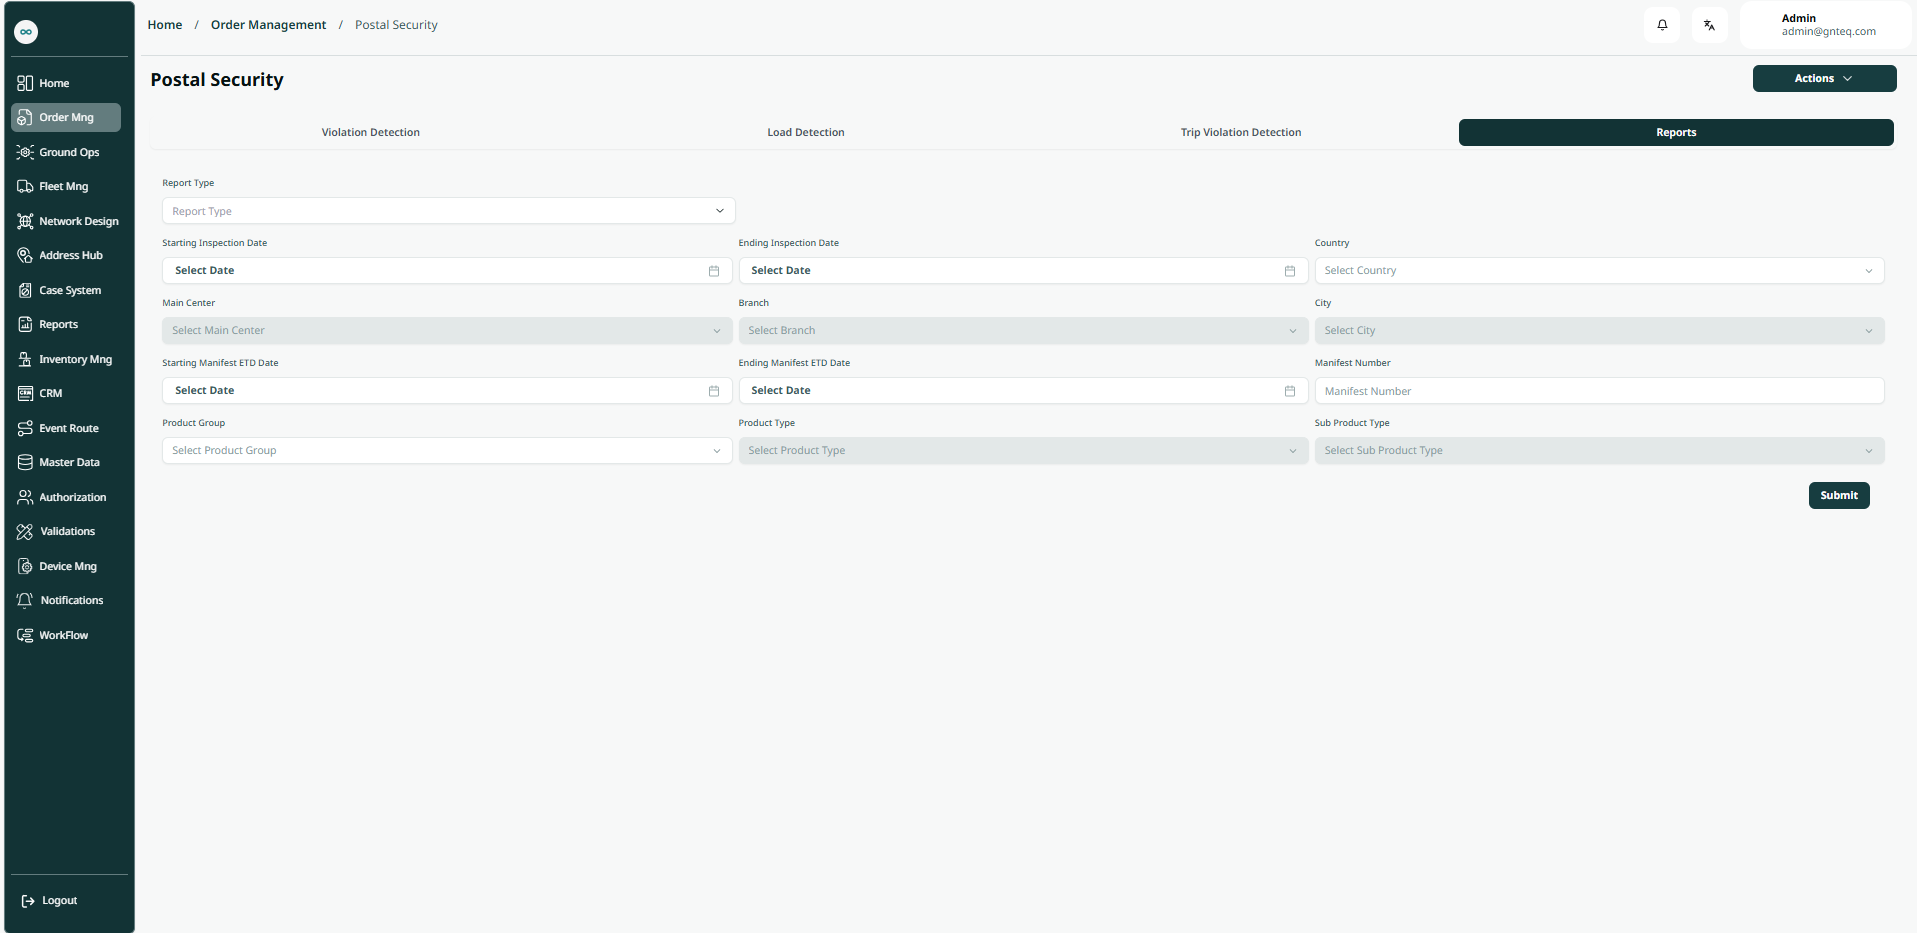
The user can add a new report that related to the postal security detection by clicking on Reports from the dashboard as follows:
-
Report Type: this field represents the type of report.
-
Starting Inspection Date: this field represents the start date of the inspection.
-
Ending Inspection Date: this field represents the end date of the inspection.
-
Country: this field represents the name of the country.
-
Main Center Code: this field represents the name of the main center.
-
Branch Code: this field represents the name of the station.
-
City: this field represents the name of the city.
-
Starting Manifest ETD Date: this field represents the estimated date and time the shipment is expected to depart from its point of origin.
-
Ending Manifest ETD Date: this field represents the estimated date and time the shipment is expected to arrive at its destination.
-
Manifest Number: this field represents the number of the manifest.
-
Product Group: this field represents the product service surcharges: International, Domestic, Return ... etc.
-
Product Type: this field represents the delivery service type e.g., express, economy, letters…..etc
-
Sub Product Type: this field represents the delivery service subtype(banks, government documents, …….etc.).
By clicking on Submit, the report will be added successfully.